The canister filter forms part of the Panigale’s evaporative-emissions system, capturing fuel vapour from the tank in an activated-charcoal medium rather than venting it directly to atmosphere. Ducati installed this system on certain 899 and 1199 market variants, notably those supplied to the United States, Canada, and Taiwan. In markets where the filter was not required, Ducati used a considerably simpler arrangement: an OEM Y-pipe combines the tank vent and filler-area drain into a downward breather line, while purpose-made vacuum-port plugs seal the unused connections in the cylinder heads.
Reasons for deleting the system vary. Owners have associated fuel-saturated canister filters with difficult hot starts, uneven running, and occasional stalling, while track-bike owners may simply value the reduced plumbing, freed space, and modest weight saving. The conversion can also be relevant when a motorcycle is exported to a jurisdiction where the same model was homologated in the factory canister-free configuration. That distinction does not, however, amount to automatic legal permission.
Converting to the factory canister-free layout
A proper canister filter delete involves more than taking the filter assembly off the motorcycle. The tank must still be able to vent and drain safely, and the two vacuum connections that previously fed the canister filter must be sealed to prevent intake leaks, unmetered airflow, and disruption to idle quality and throttle-body balance.
The OEM-style conversion has two parts:
- Replace the canister filter plumbing with Ducati’s factory Y-pipe tank-vent arrangement.
- Replace the canister-filter-side vacuum union in each cylinder head with a vacuum-port plug and sealing gasket.
This produces the same basic layout Ducati used on 899 Panigales sold without the canister filter system. The procedure also applies to canister-filter-equipped 1199 Panigale versions, but the OEM part numbers documented here were verified against the cited 899 catalogues. Check the correct fiche before ordering parts for a different model year or an 1199.
The forum threads linked near the end are useful general guides and were the starting point for researching this job. The Ducati parts catalogues and market-specific diagrams are the source of the OEM configuration and part numbers used below.
Warning
Work only on a cold motorcycle. Keep dirt out of the intake system, keep all vent hoses away from the exhaust and moving parts, and check for vacuum leaks before riding. Removing emissions equipment may not be legal for a road motorcycle where you live.
Parts required
Cylinder-head vacuum ports
2x 77350618B- SCREW TCEIR M6X82x 85250231A- GASKET
These replace one canister-filter-side 81413341A UNION in each head. Do not remove the other factory union retained by the canister-free configuration.
OEM tank-vent Y-pipe arrangement
2x 59013901A- PIPE1x 61610021A- THREE-WAYS UNION1x 59013911B- BREATHER PIPE
The catalogue calls 61610021A a three-ways union. In practical terms, it is the OEM Y-pipe that joins the two tank hoses to the single downward breather hose.
Existing hose may be reusable if its size, material, routing, and condition are suitable. The catalogue part numbers above describe the complete factory arrangement.
What changes during the delete
1. Remove the canister filter and install the OEM Y-pipe
Before disconnecting anything, identify the two hoses from the fuel tank and the vacuum hoses running to the cylinder heads. The tank vent and filler-area drain are different functions, even though the OEM Y-pipe routes both hoses downward through a shared outlet arrangement.
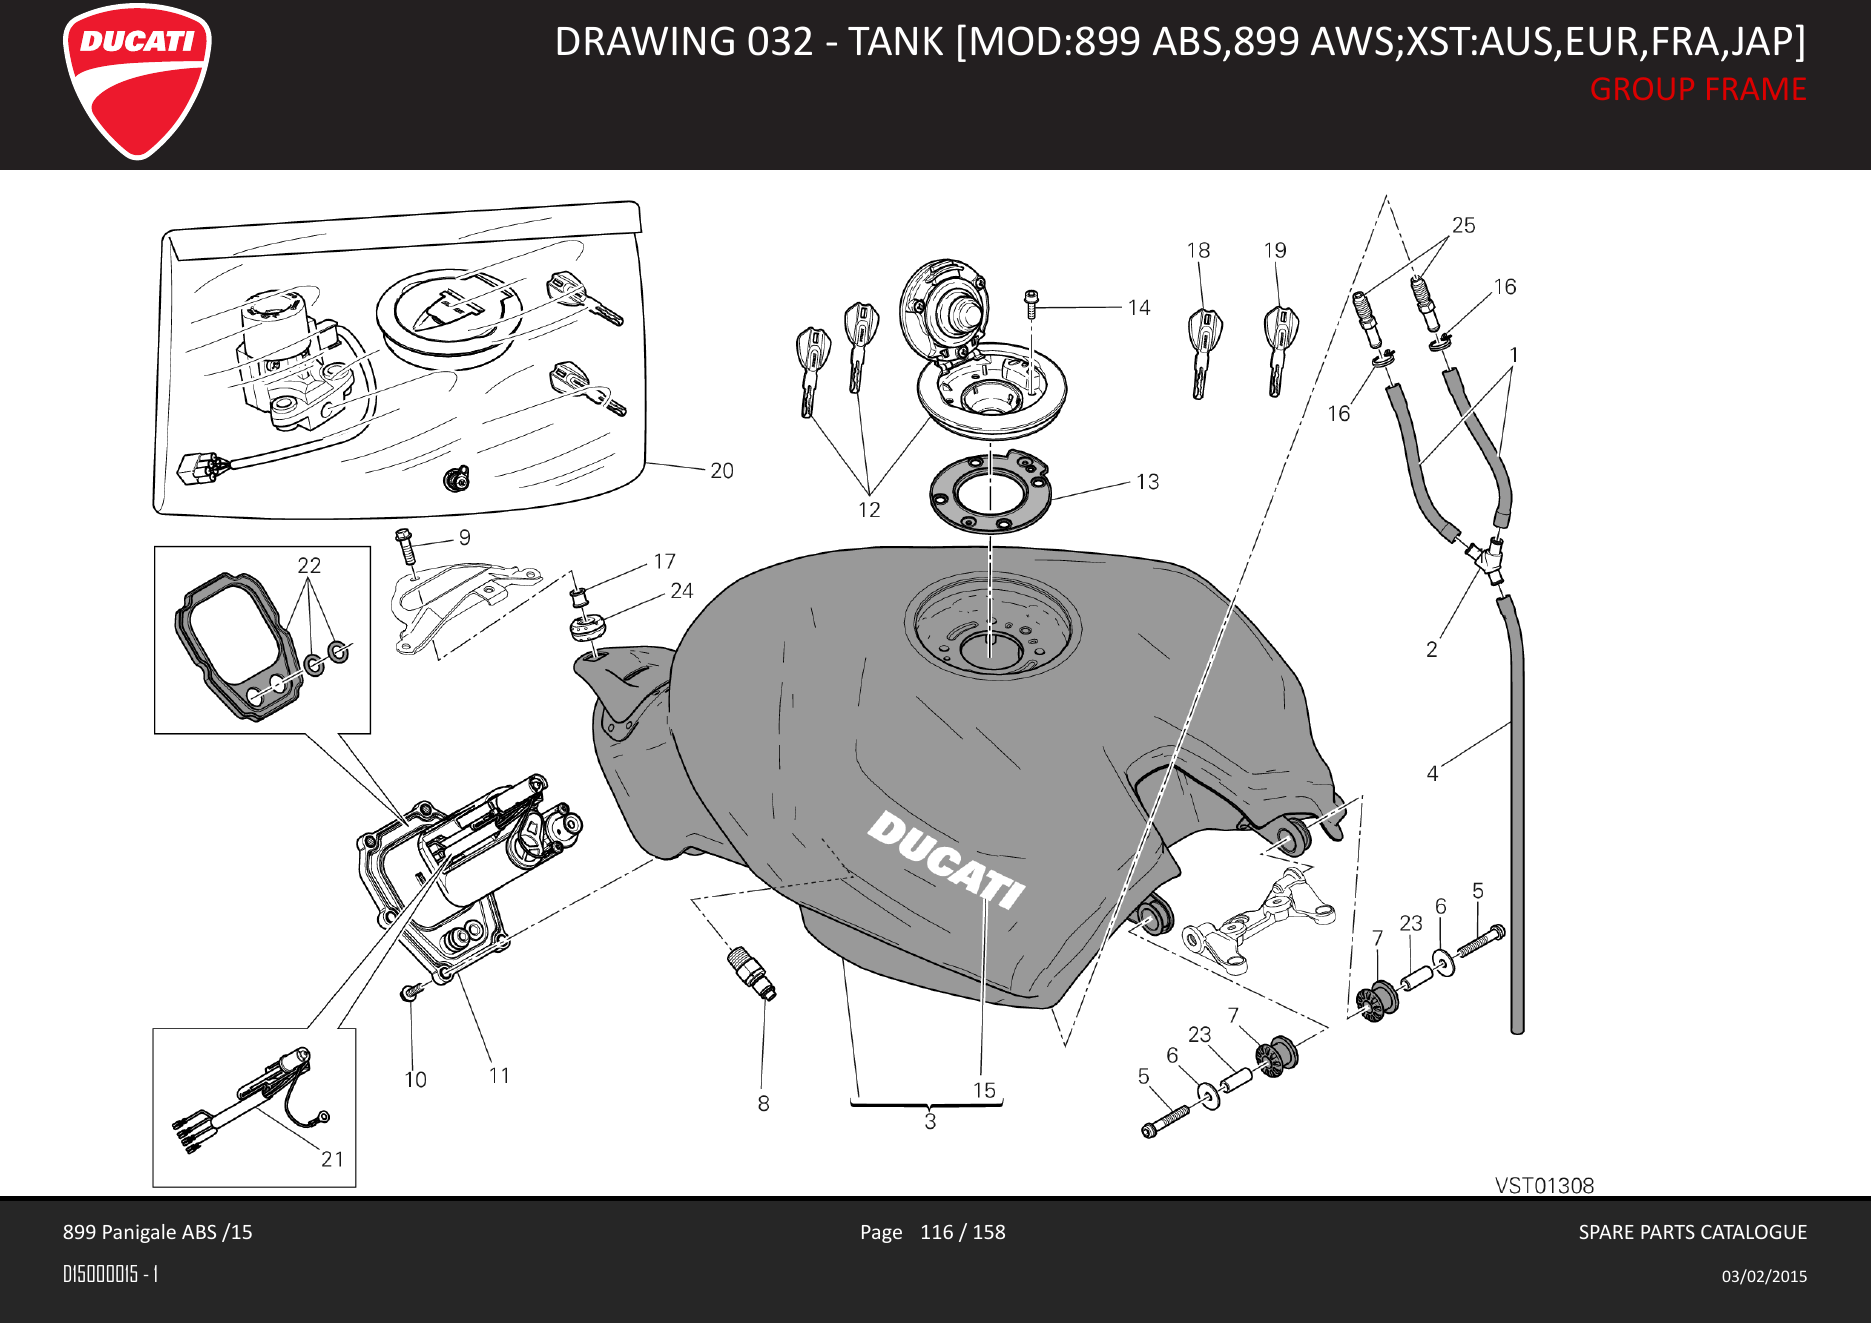
Remove the canister filter and the holder, clamps, hoses, and fittings used only by that system. Do not cap either tank hose. Join the two tank pipes with 61610021A, connect the downward 59013911B breather pipe, and route its open end below the motorcycle. The hose must remain unkinked and clear of exhaust heat and moving parts.
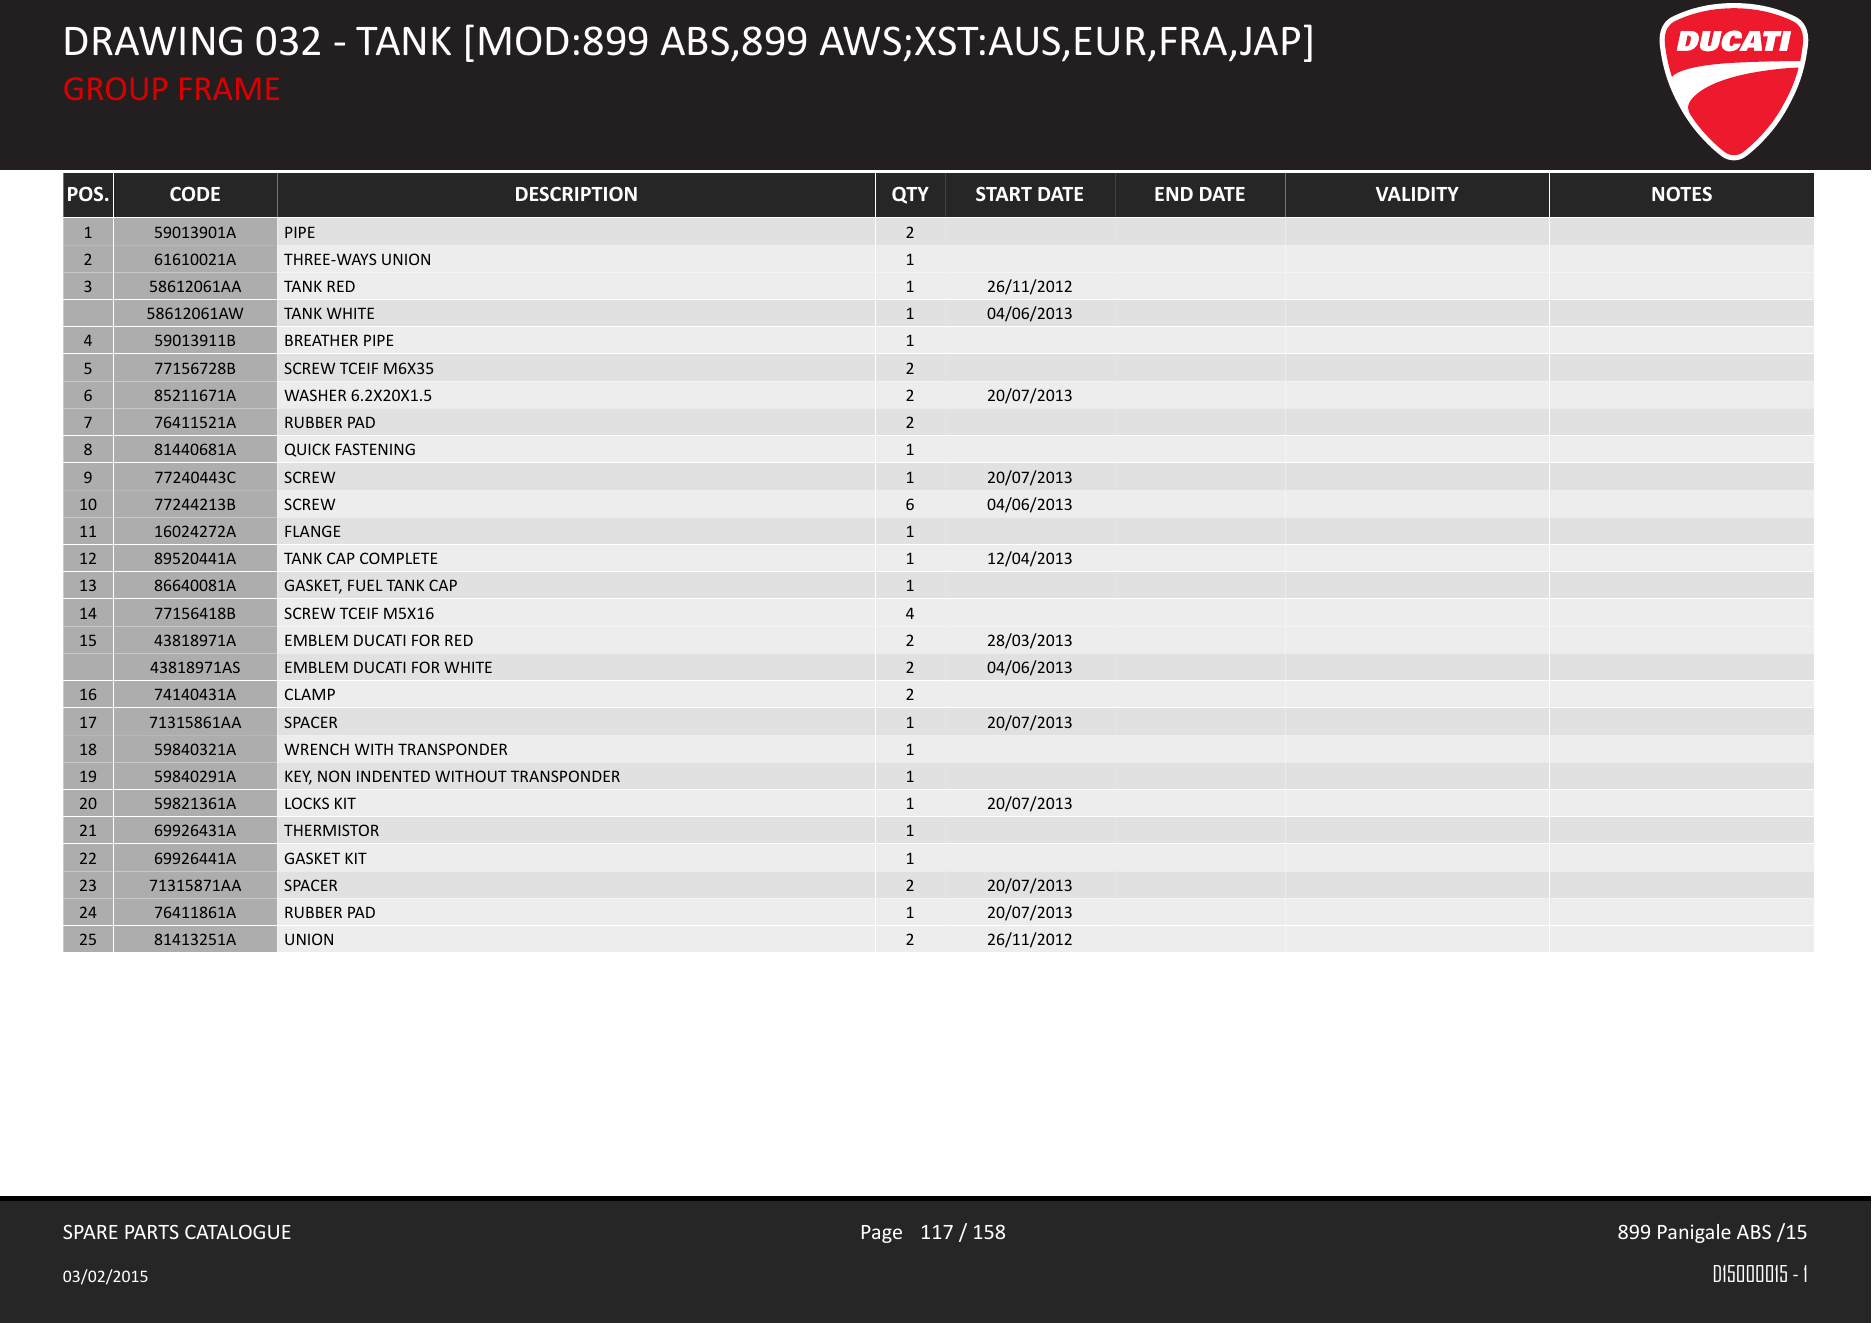
The factory evidence is on pages 116-117 of the 2015 multilingual catalogue. Page 116 shows the two upper hoses joining through item 2 and continuing downward through item 4. Page 117 identifies:
| Position | Part number | Catalogue description | Quantity |
|---|---|---|---|
| 1 | 59013901A | PIPE | 2 |
| 2 | 61610021A | THREE-WAYS UNION | 1 |
| 4 | 59013911B | BREATHER PIPE | 1 |
2. Install the vacuum-port plugs in the heads
Trace the canister filter vacuum hose to each cylinder head. Remove only the 81413341A union that supplied that hose. There is one to remove from the horizontal head and one from the vertical head.
Clean each exposed sealing face and thread while keeping debris out of the intake. Fit one new 85250231A gasket under each 77350618B M6x8 screw, start both screws by hand, and tighten them according to the torque guidance below.
This seals the vacuum ports directly at the heads and eliminates the long canister filter vacuum hoses. It is more durable and closer to the factory canister-free configuration than leaving the unions installed and fitting rubber caps to them.
The canister-filter-equipped configuration
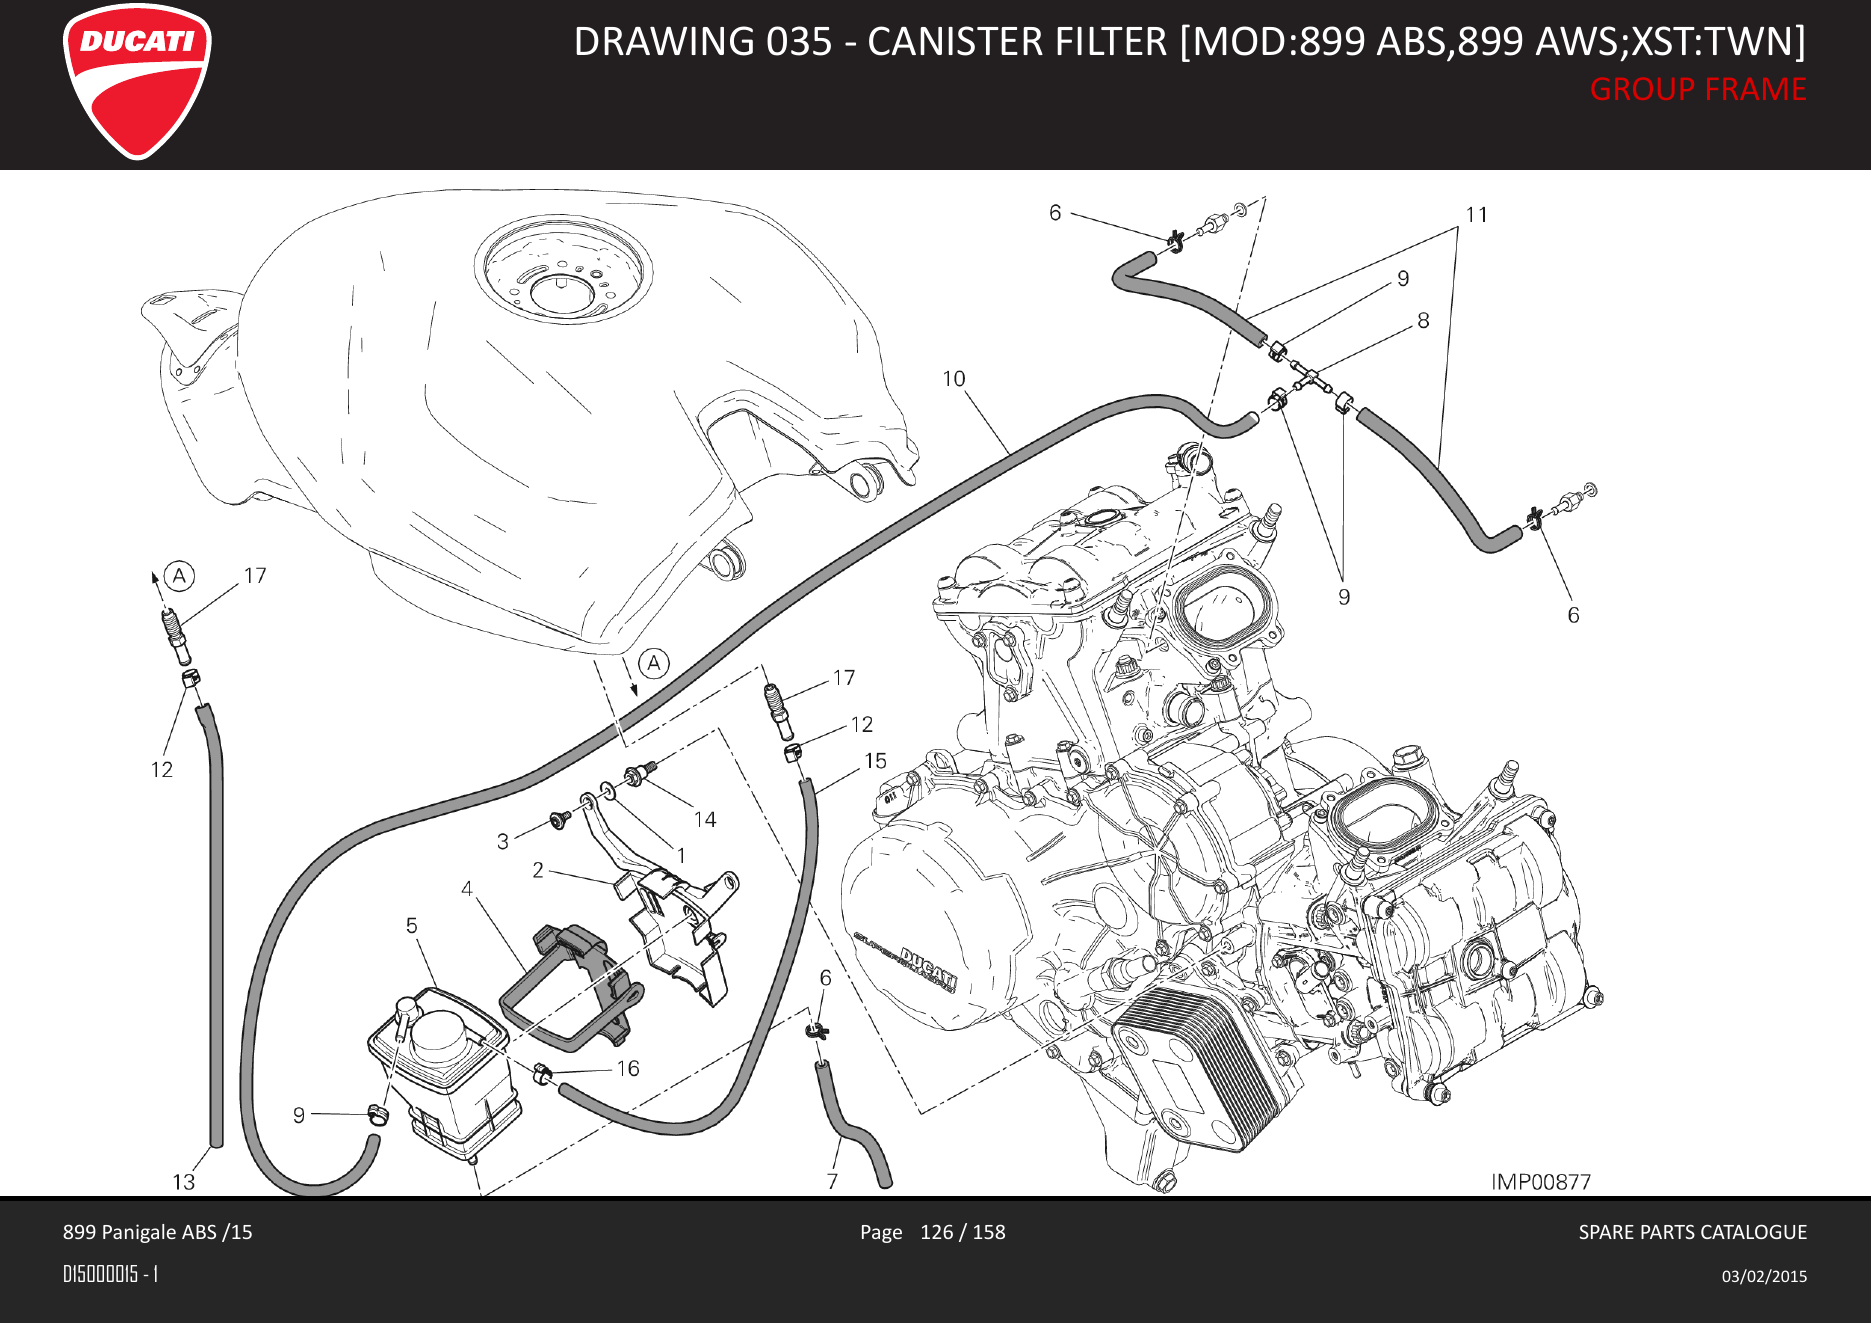
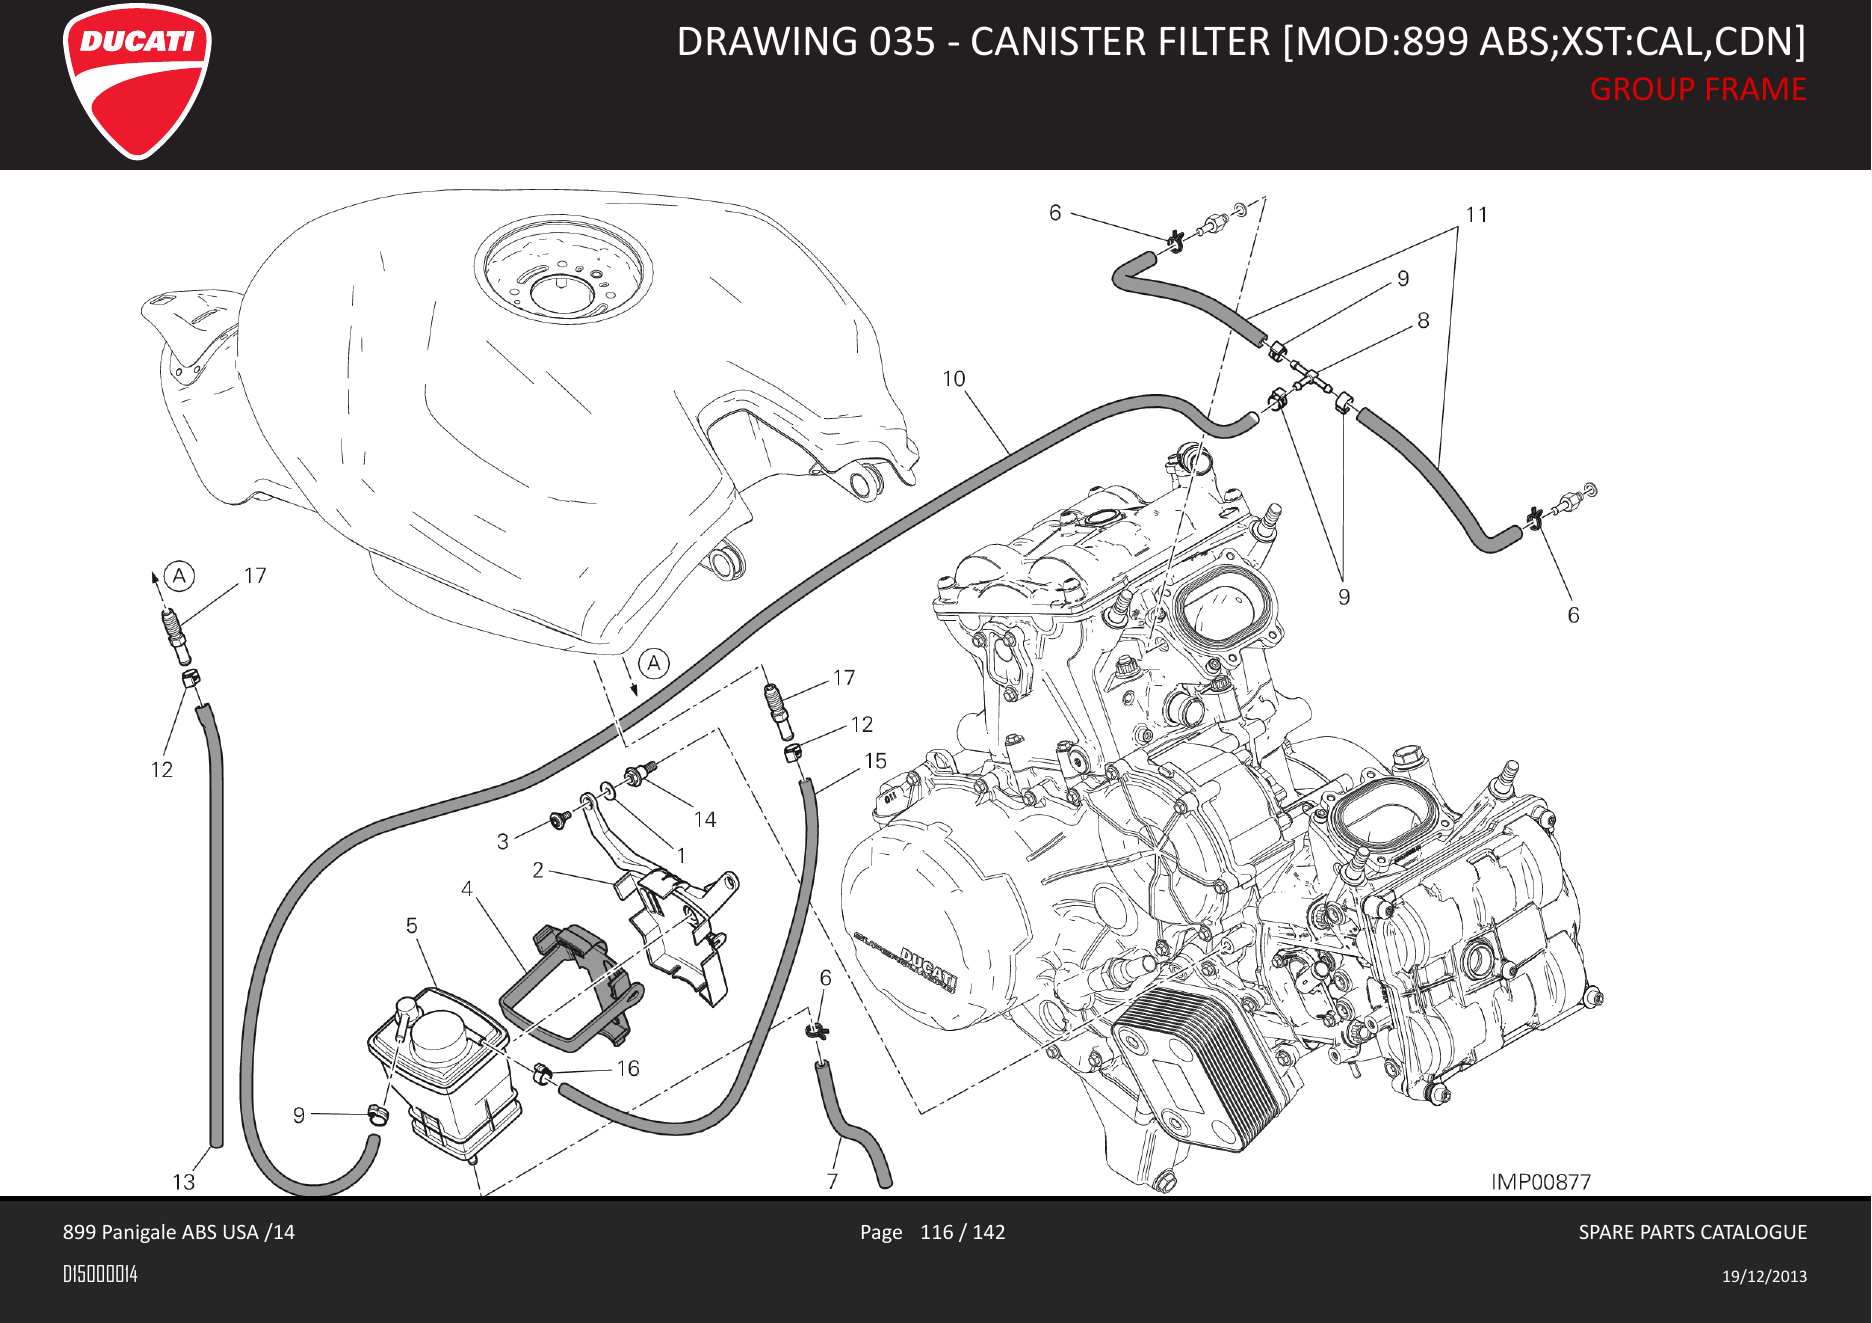
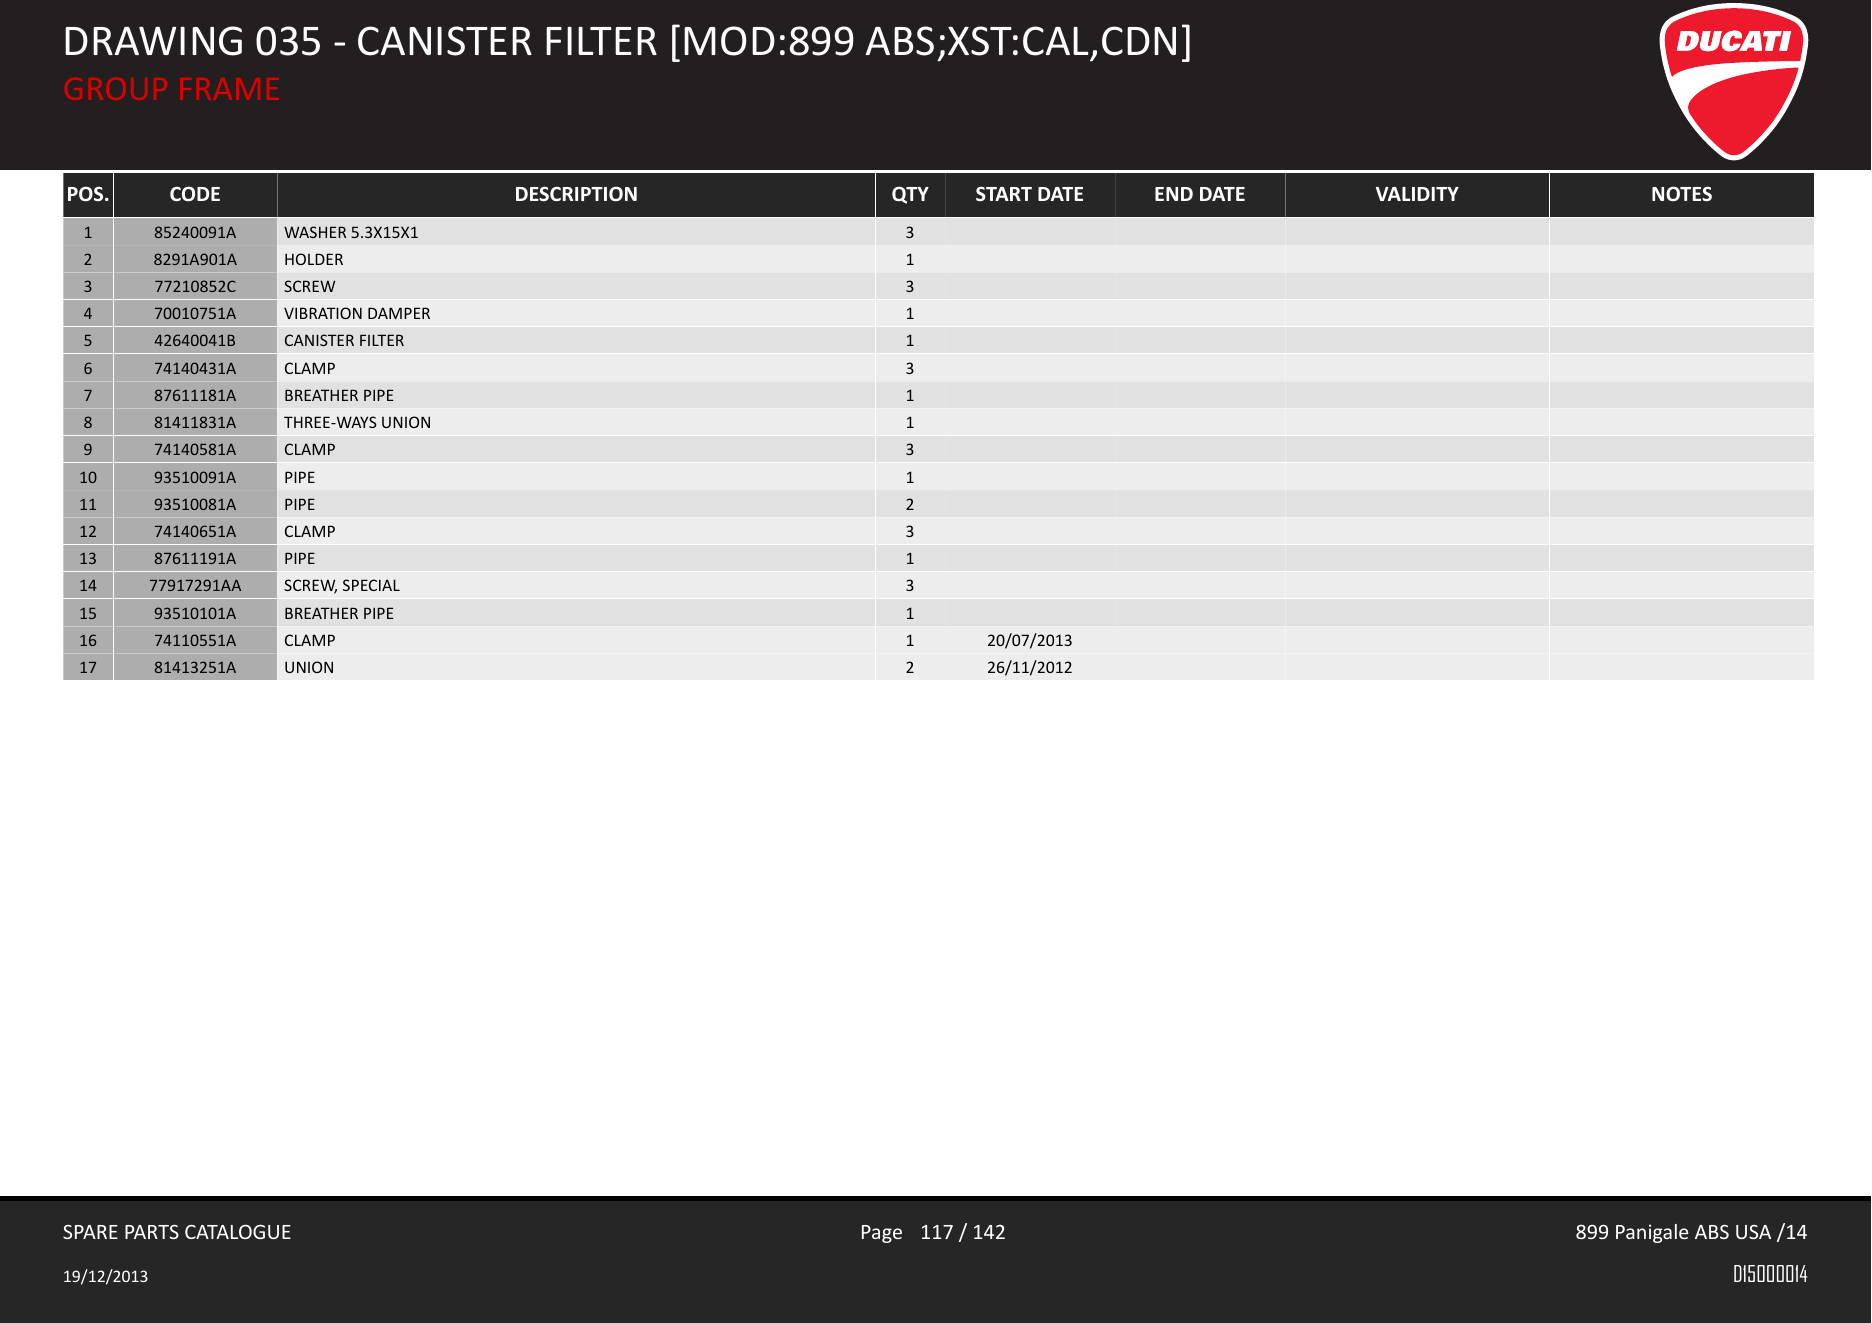
The 2015 multilingual catalogue shows the Taiwan canister filter assembly in Drawing 035, pages 126-127, marked XST:TWN. The separate USA MY14 catalogue shows the US/Canada equivalent on its own pages 116-117, marked XST:CAL,CDN.
These page numbers are easy to confuse: pages 116-117 in the 2015 multilingual catalogue show the canister-free tank and OEM Y-pipe, while pages 116-117 in the separate USA MY14 catalogue show the canister filter assembly.
The canister filter assembly includes:
42640041B- CANISTER FILTER8291A901A- HOLDER81411831A- THREE-WAYS UNION87611181A- BREATHER PIPE93510091A- PIPE93510081A- PIPE, quantity 287611191A- PIPE93510101A- BREATHER PIPE81413251A- UNION, quantity 2- the associated clamps, washers, vibration damper, and mounting screws
OEM vacuum-port configuration
The cylinder-head fiches show exactly what changes at the vacuum ports.
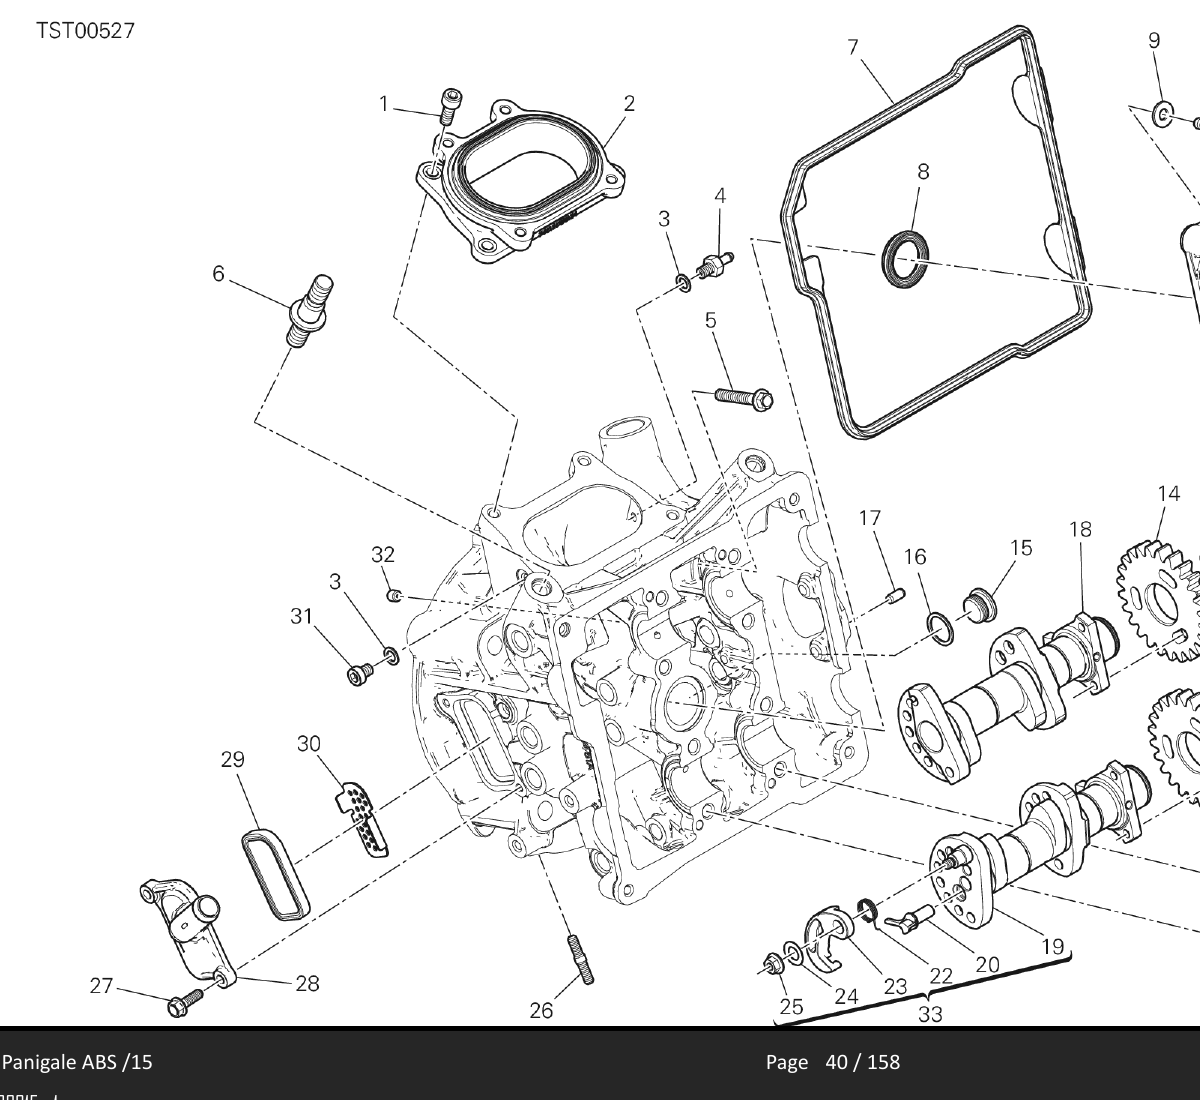
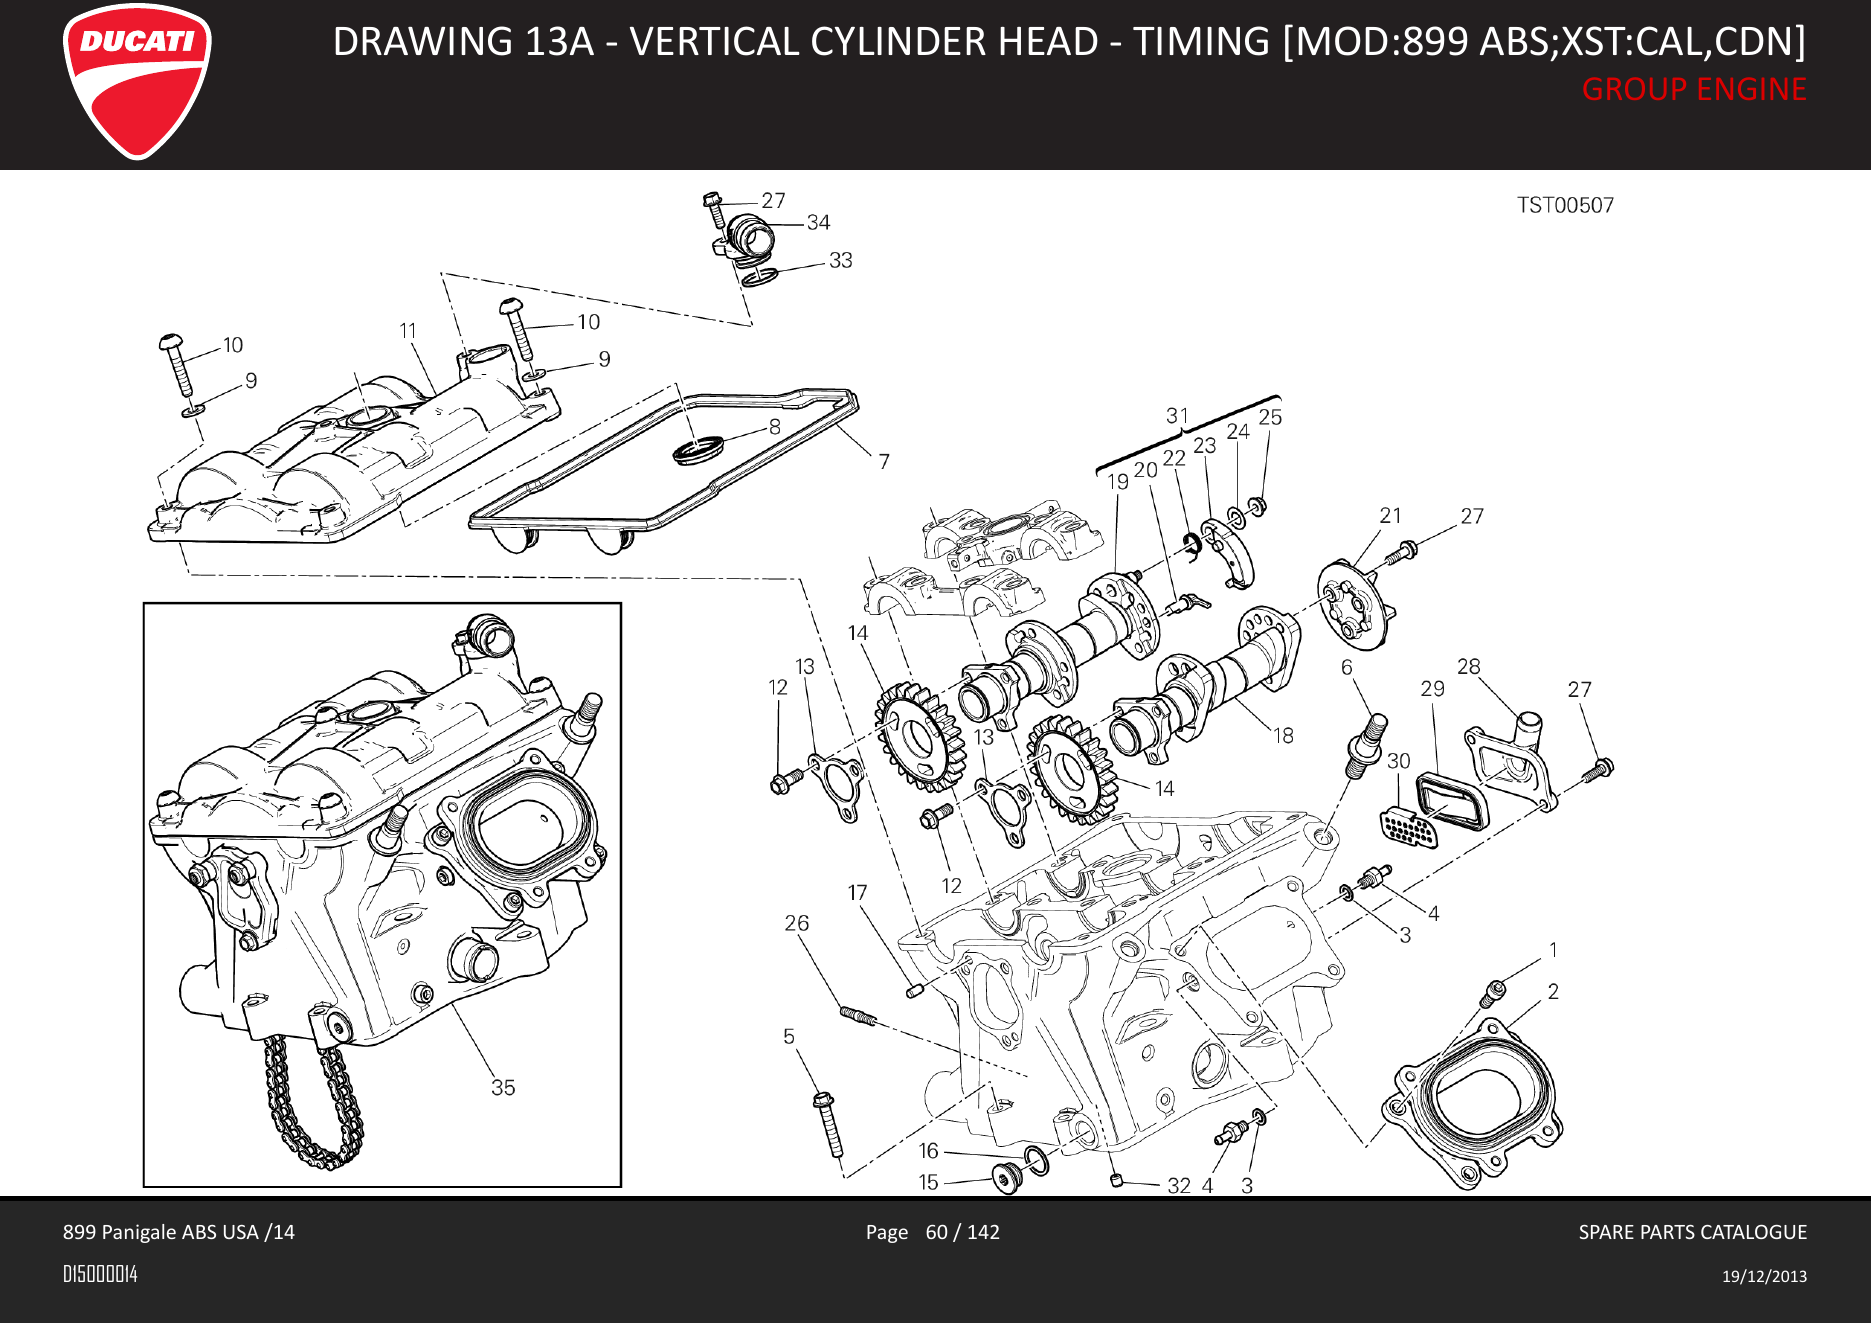
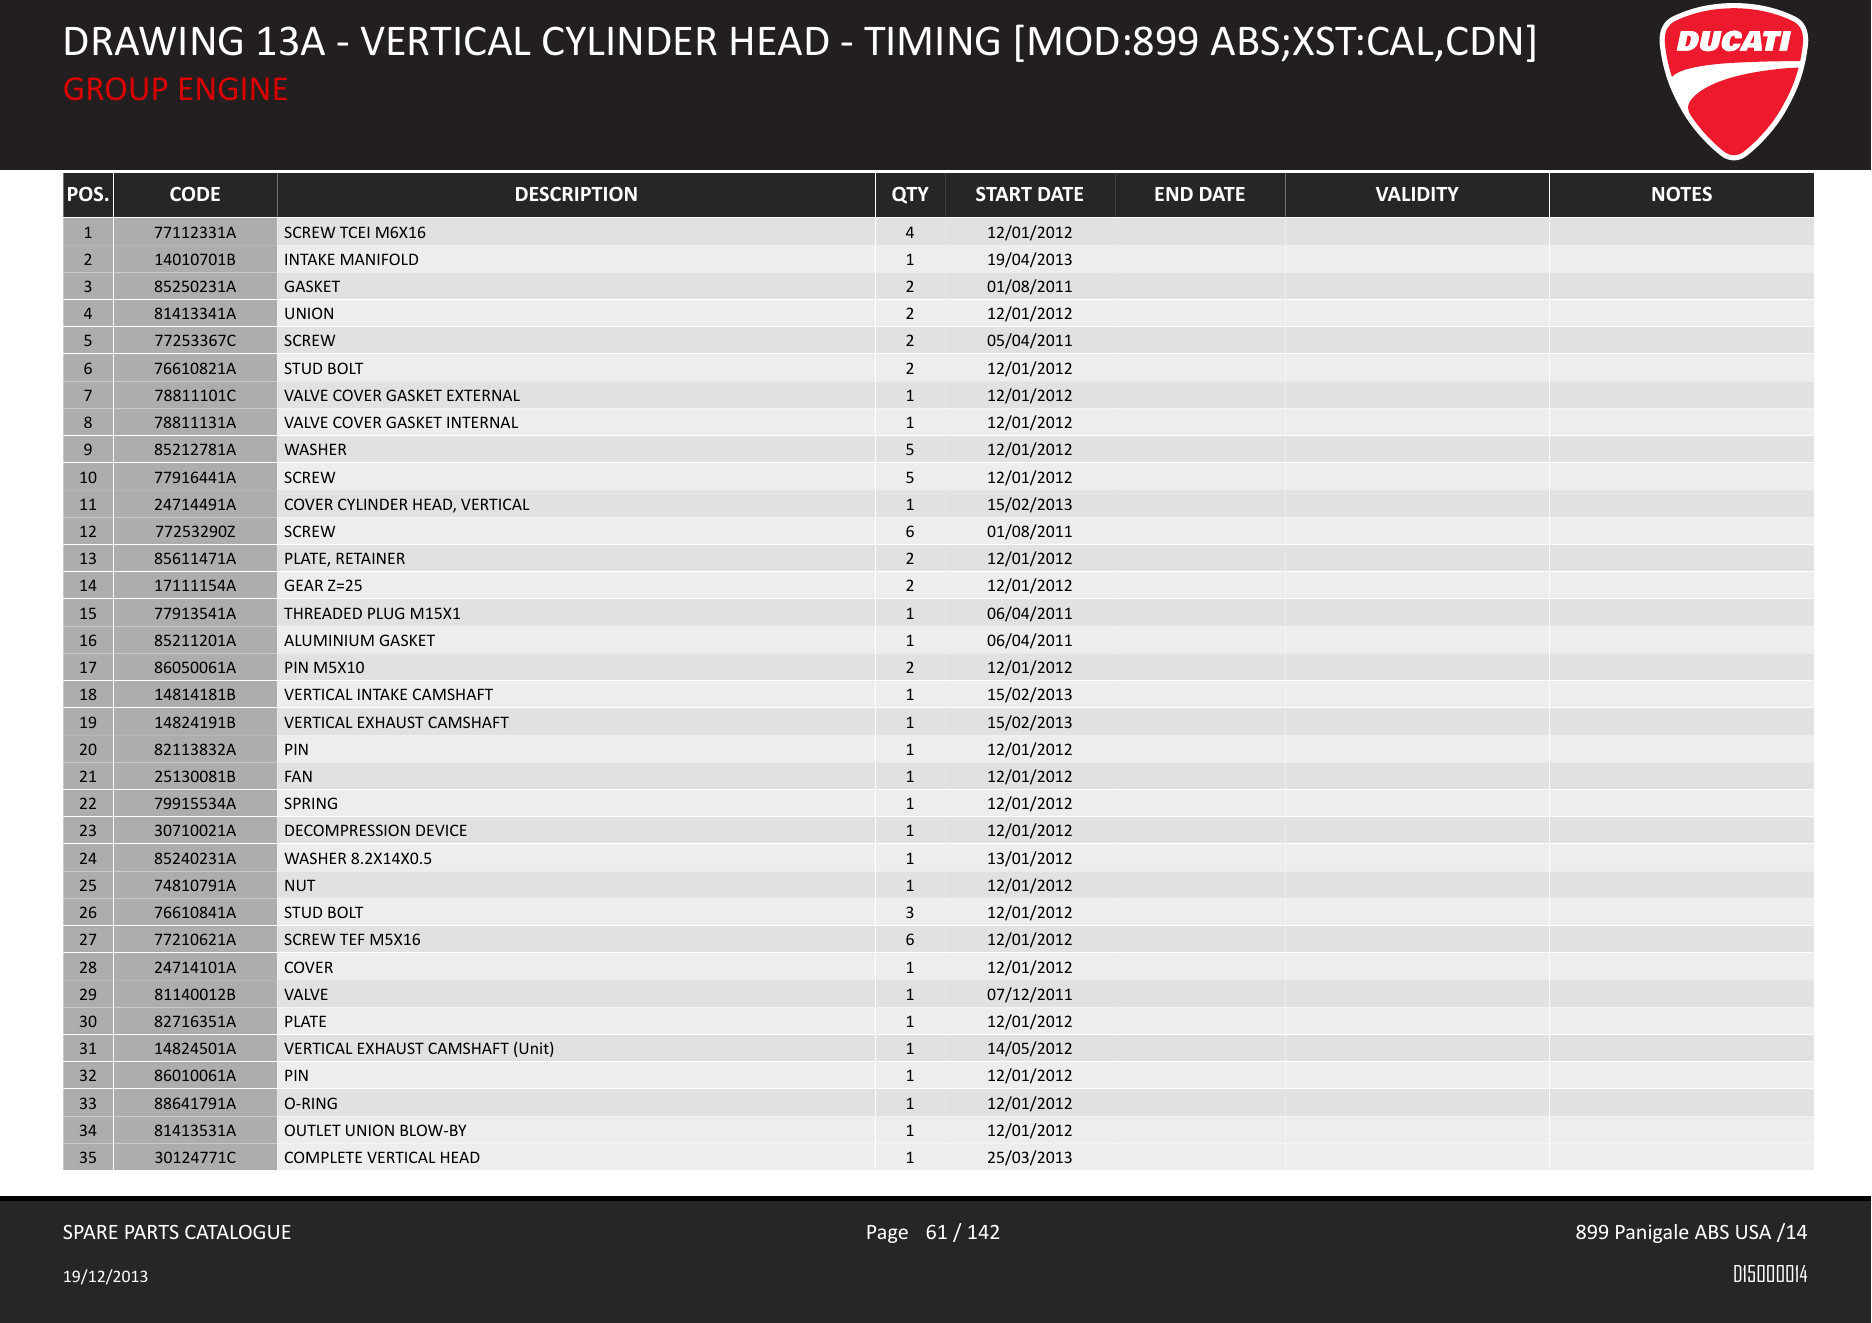
Each head in the USA catalogue lists:
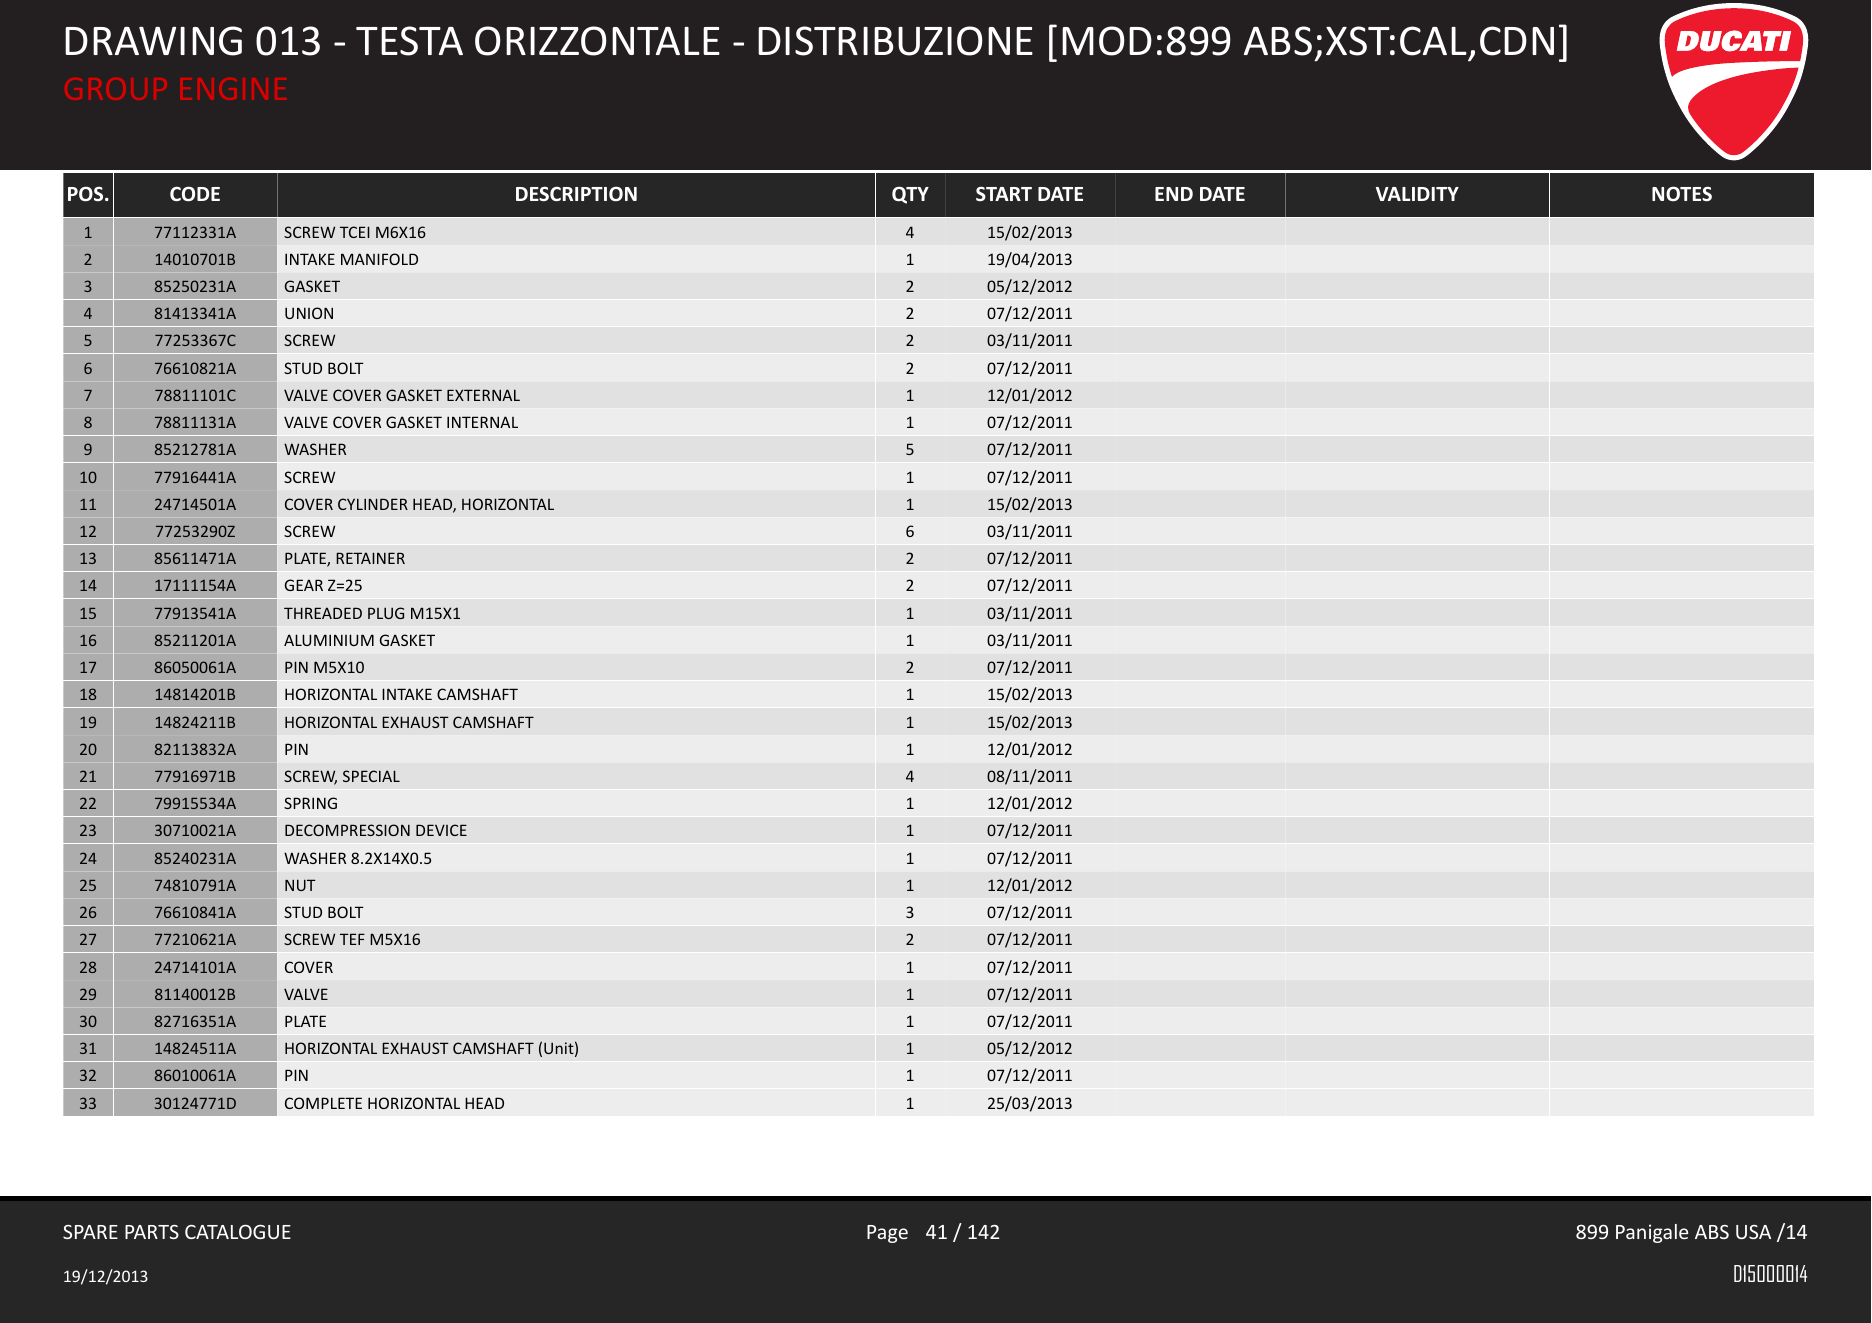
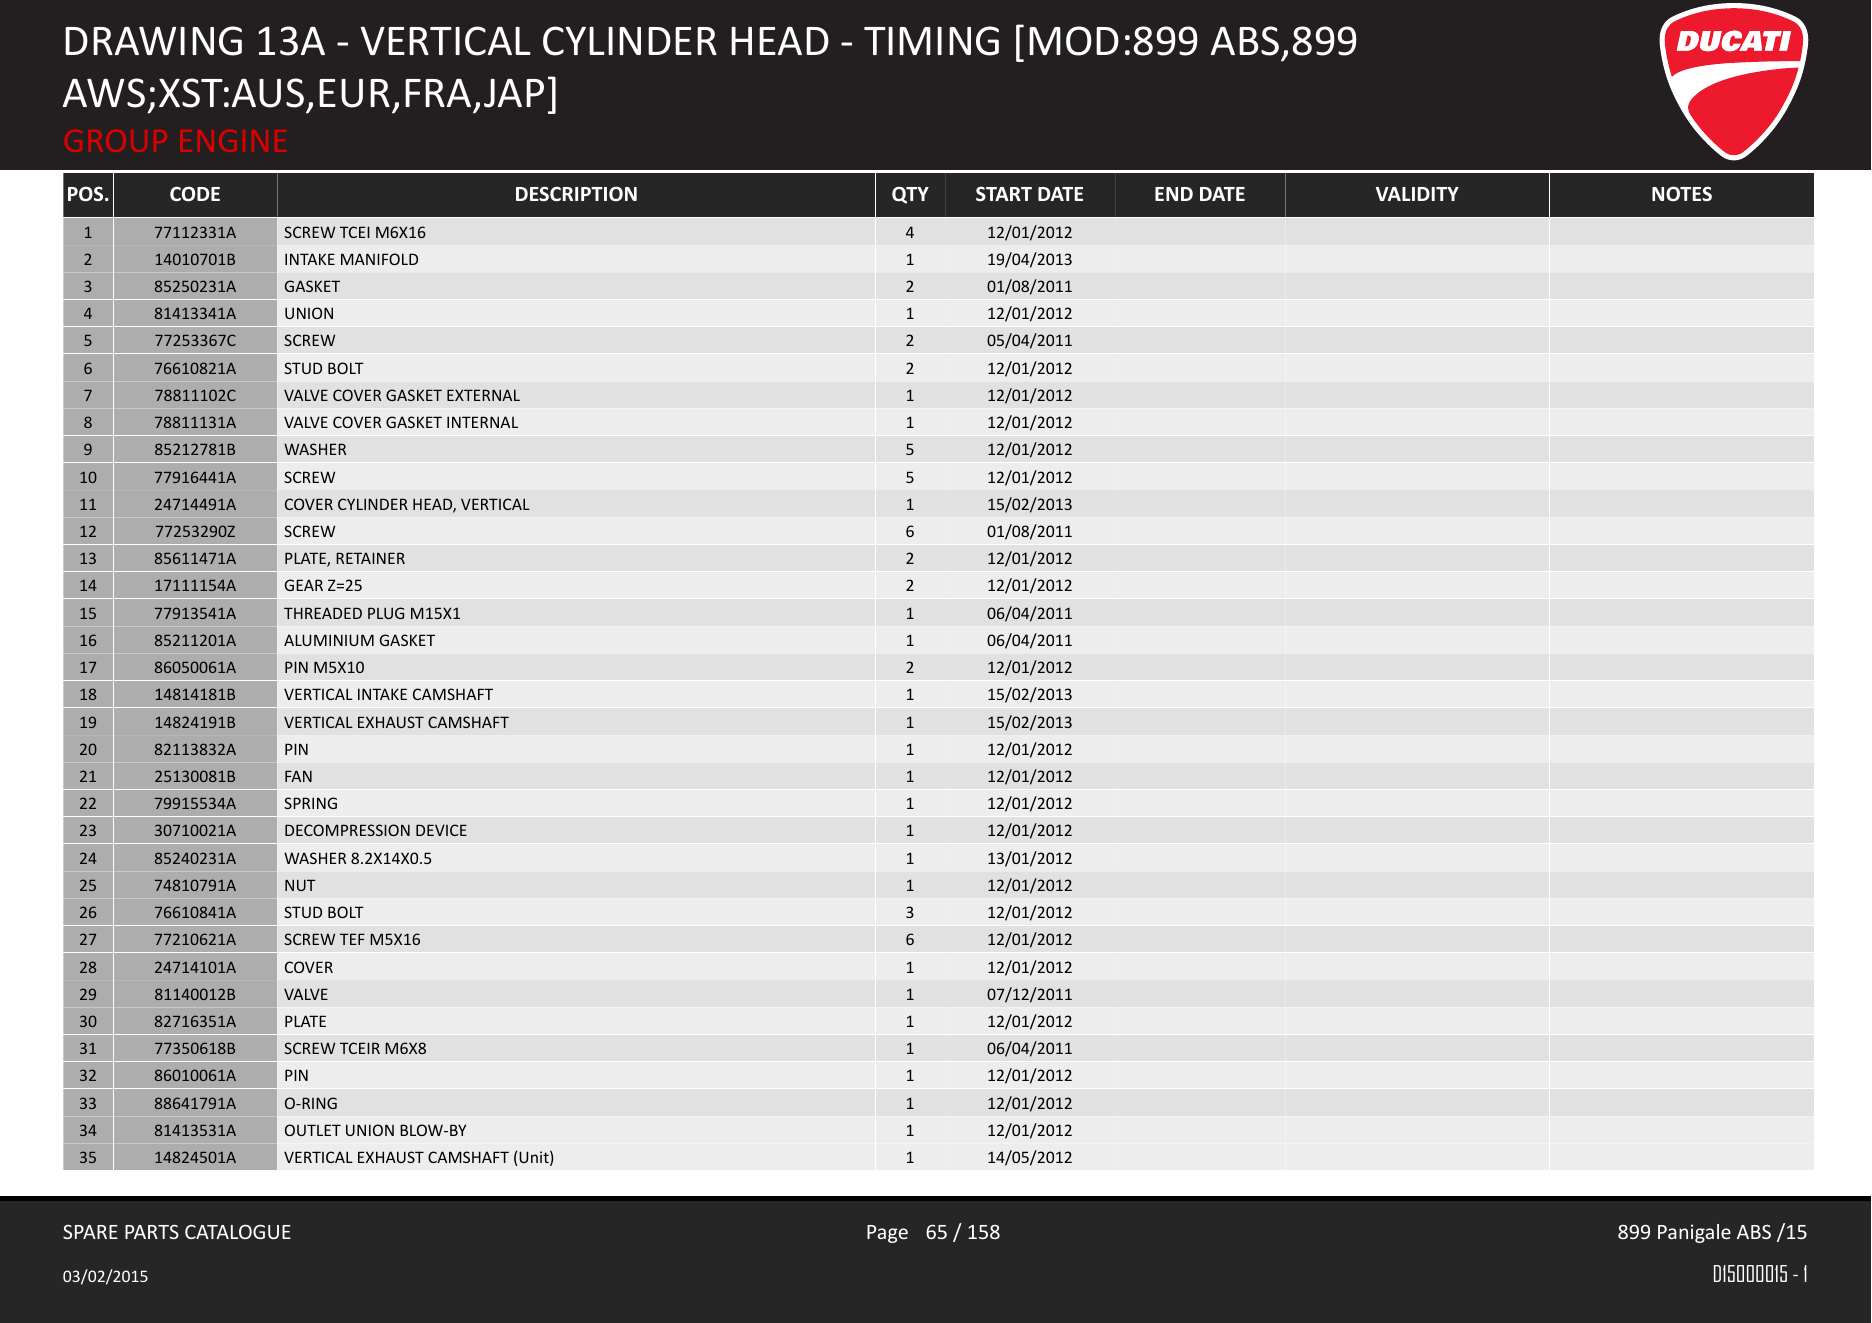
85250231A- GASKET, quantity 281413341A- UNION, quantity 2
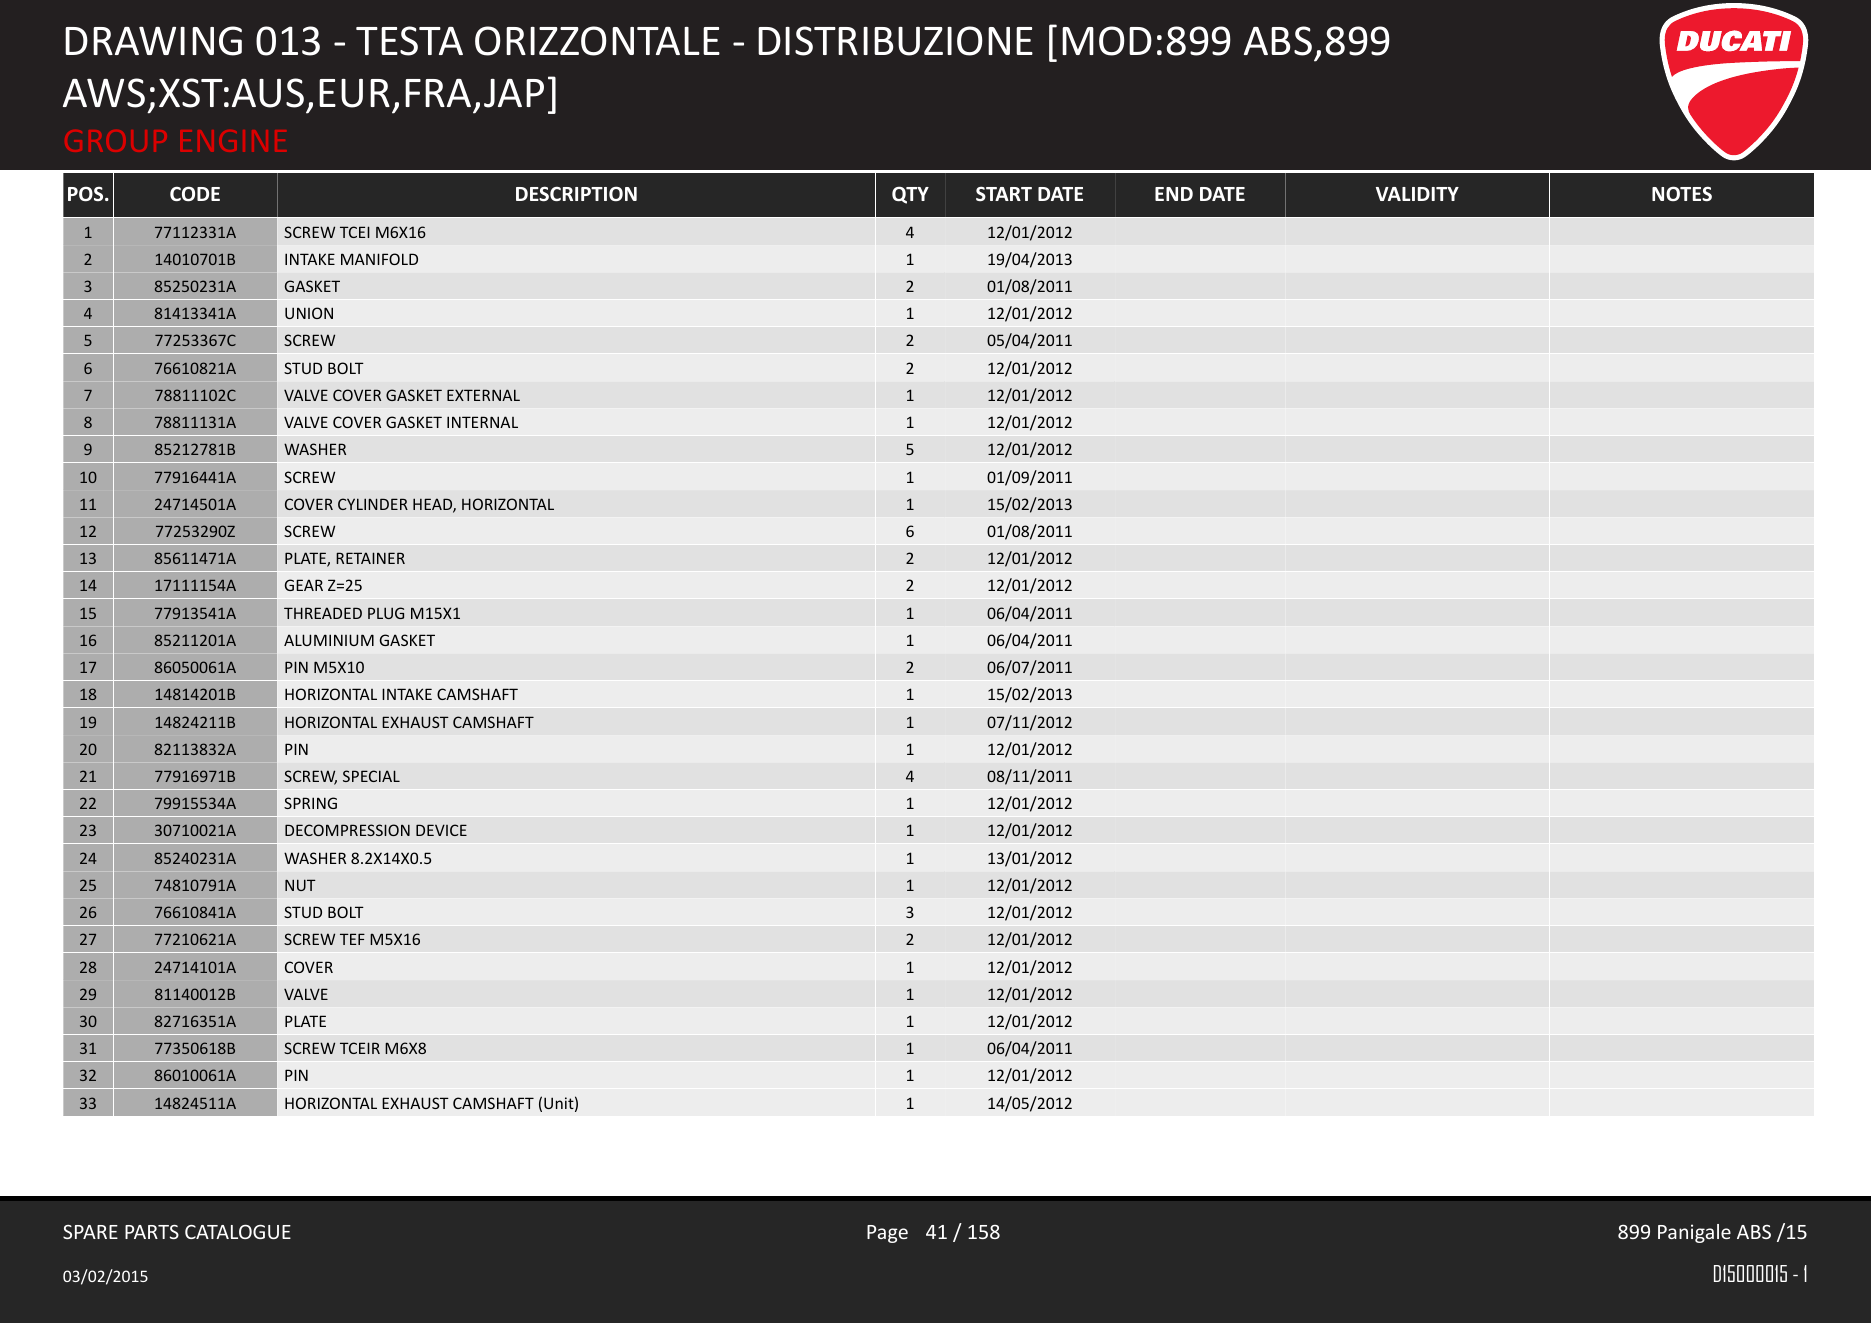
Each corresponding head in the canister-free catalogue lists:
85250231A- GASKET, quantity 281413341A- UNION, quantity 177350618B- SCREW TCEIR M6X8, quantity 1
The quantities apply to each individual head assembly. The canister-free configuration retains one union per head and replaces the canister-filter-side union with one vacuum-port plug. Across the complete motorcycle, the conversion therefore requires two screws and two new gaskets.
Horizontal cylinder head
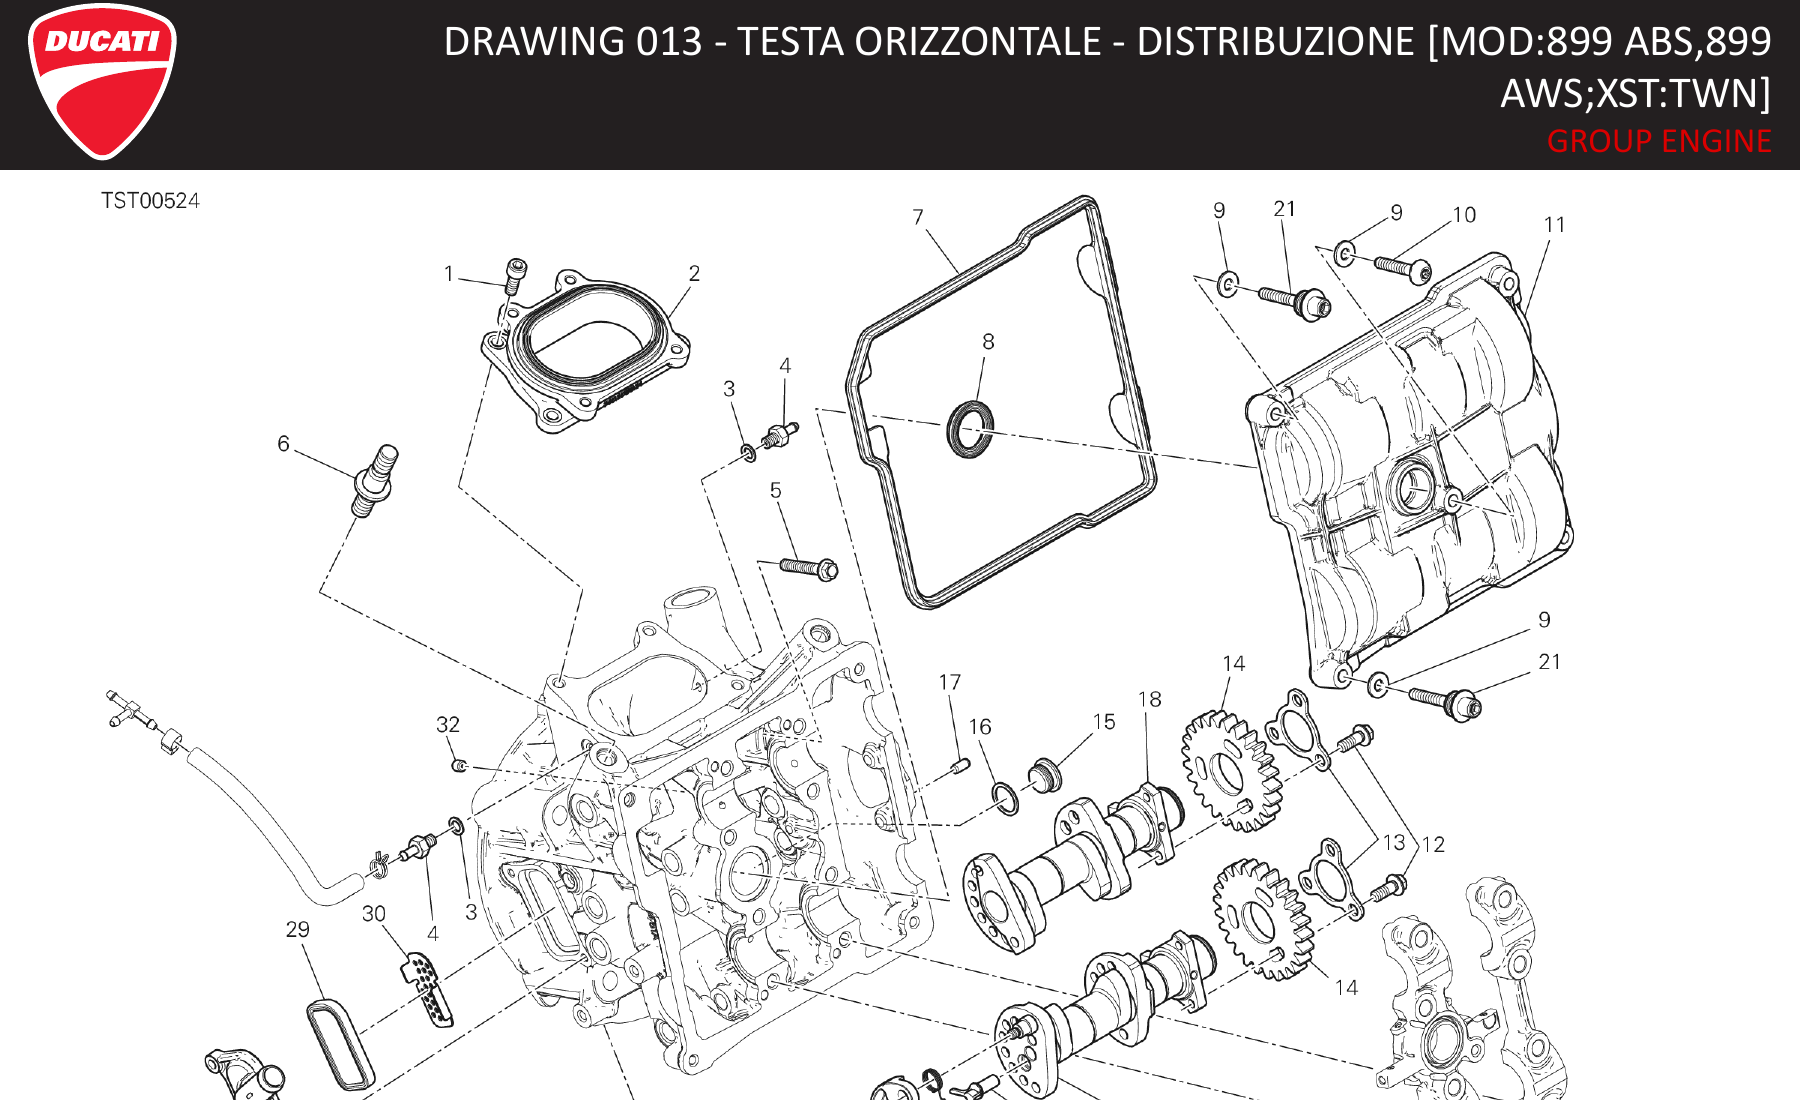
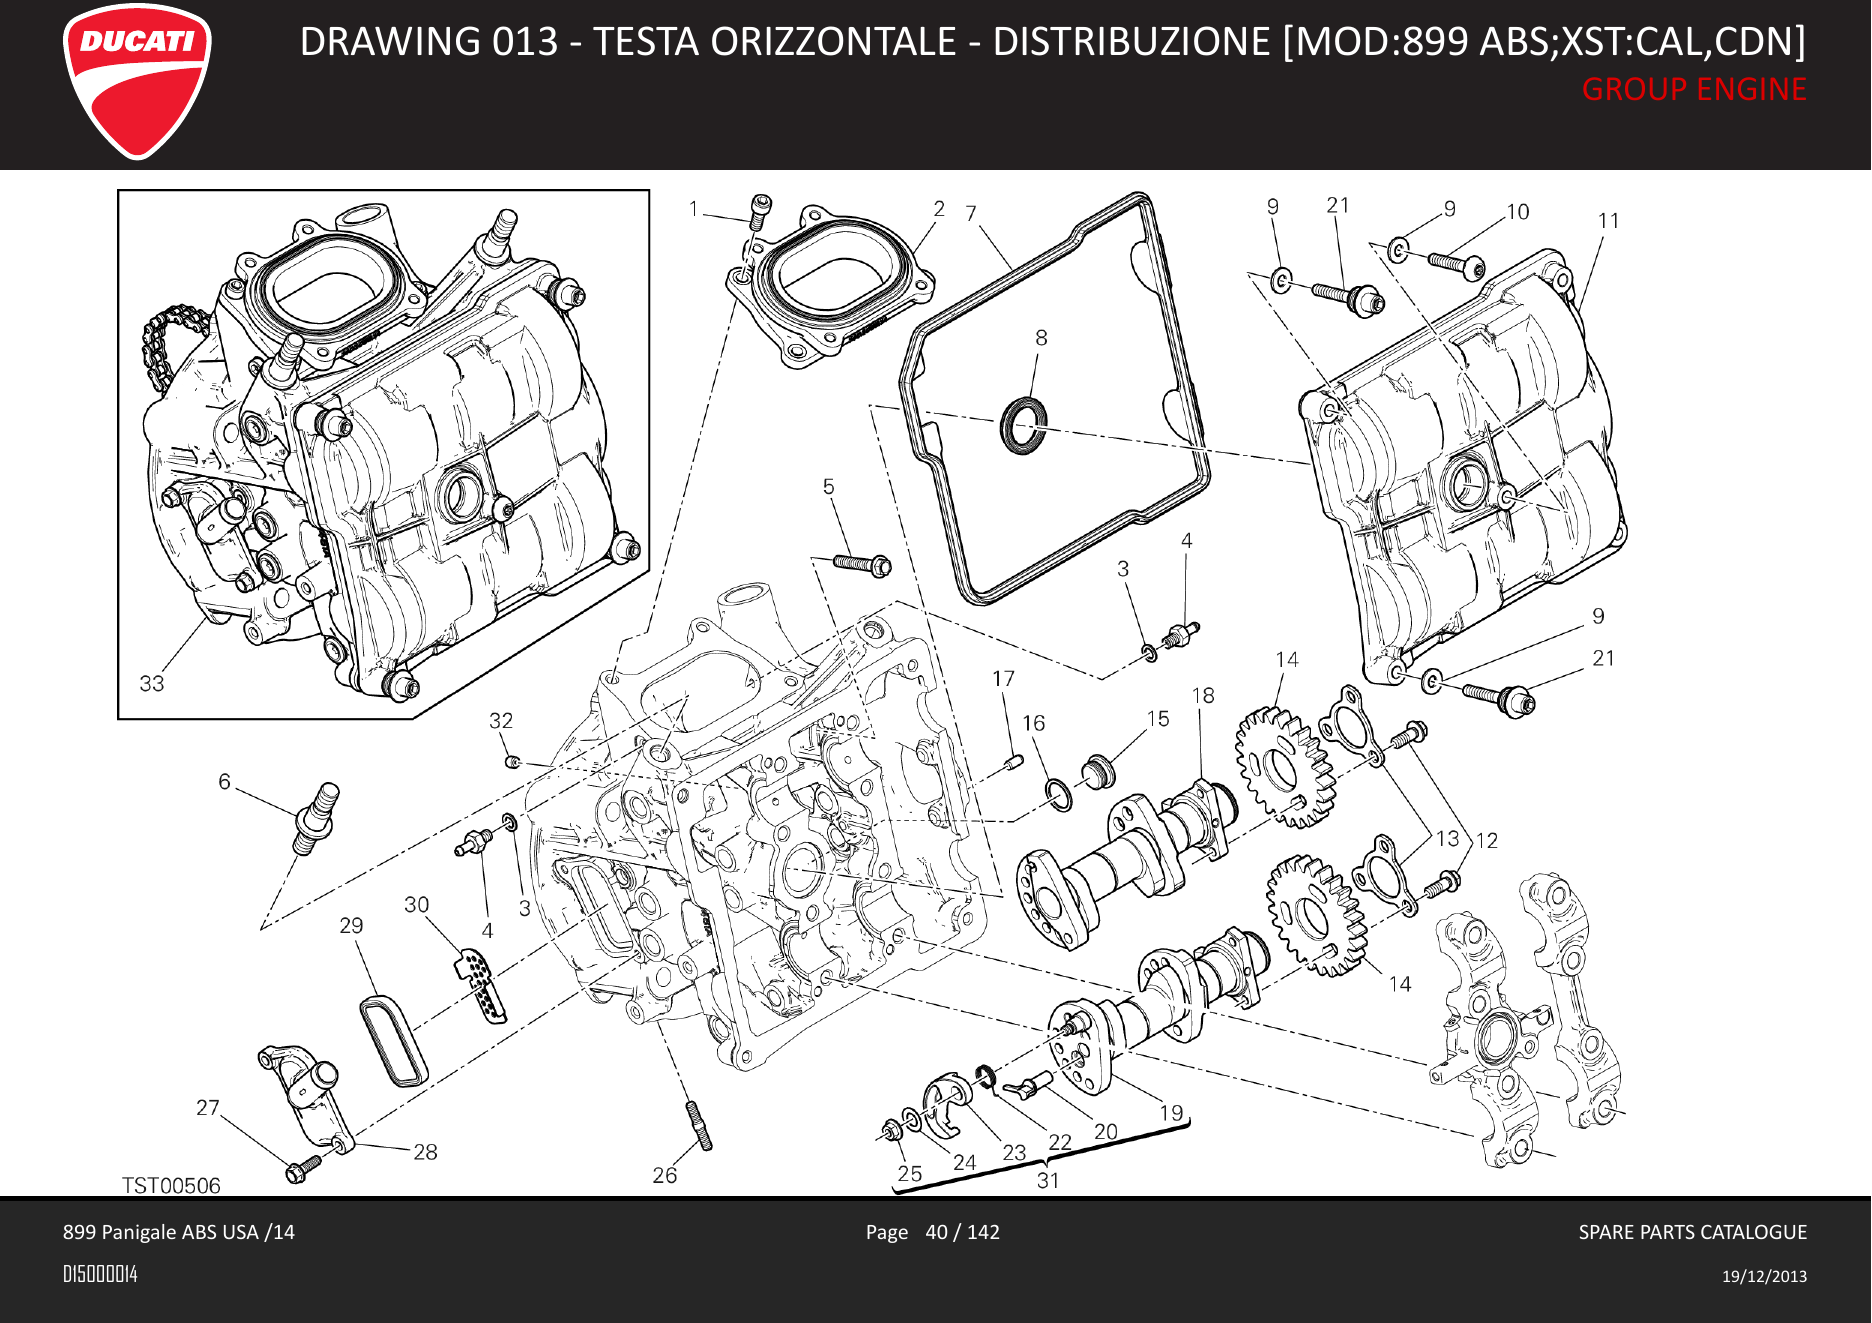
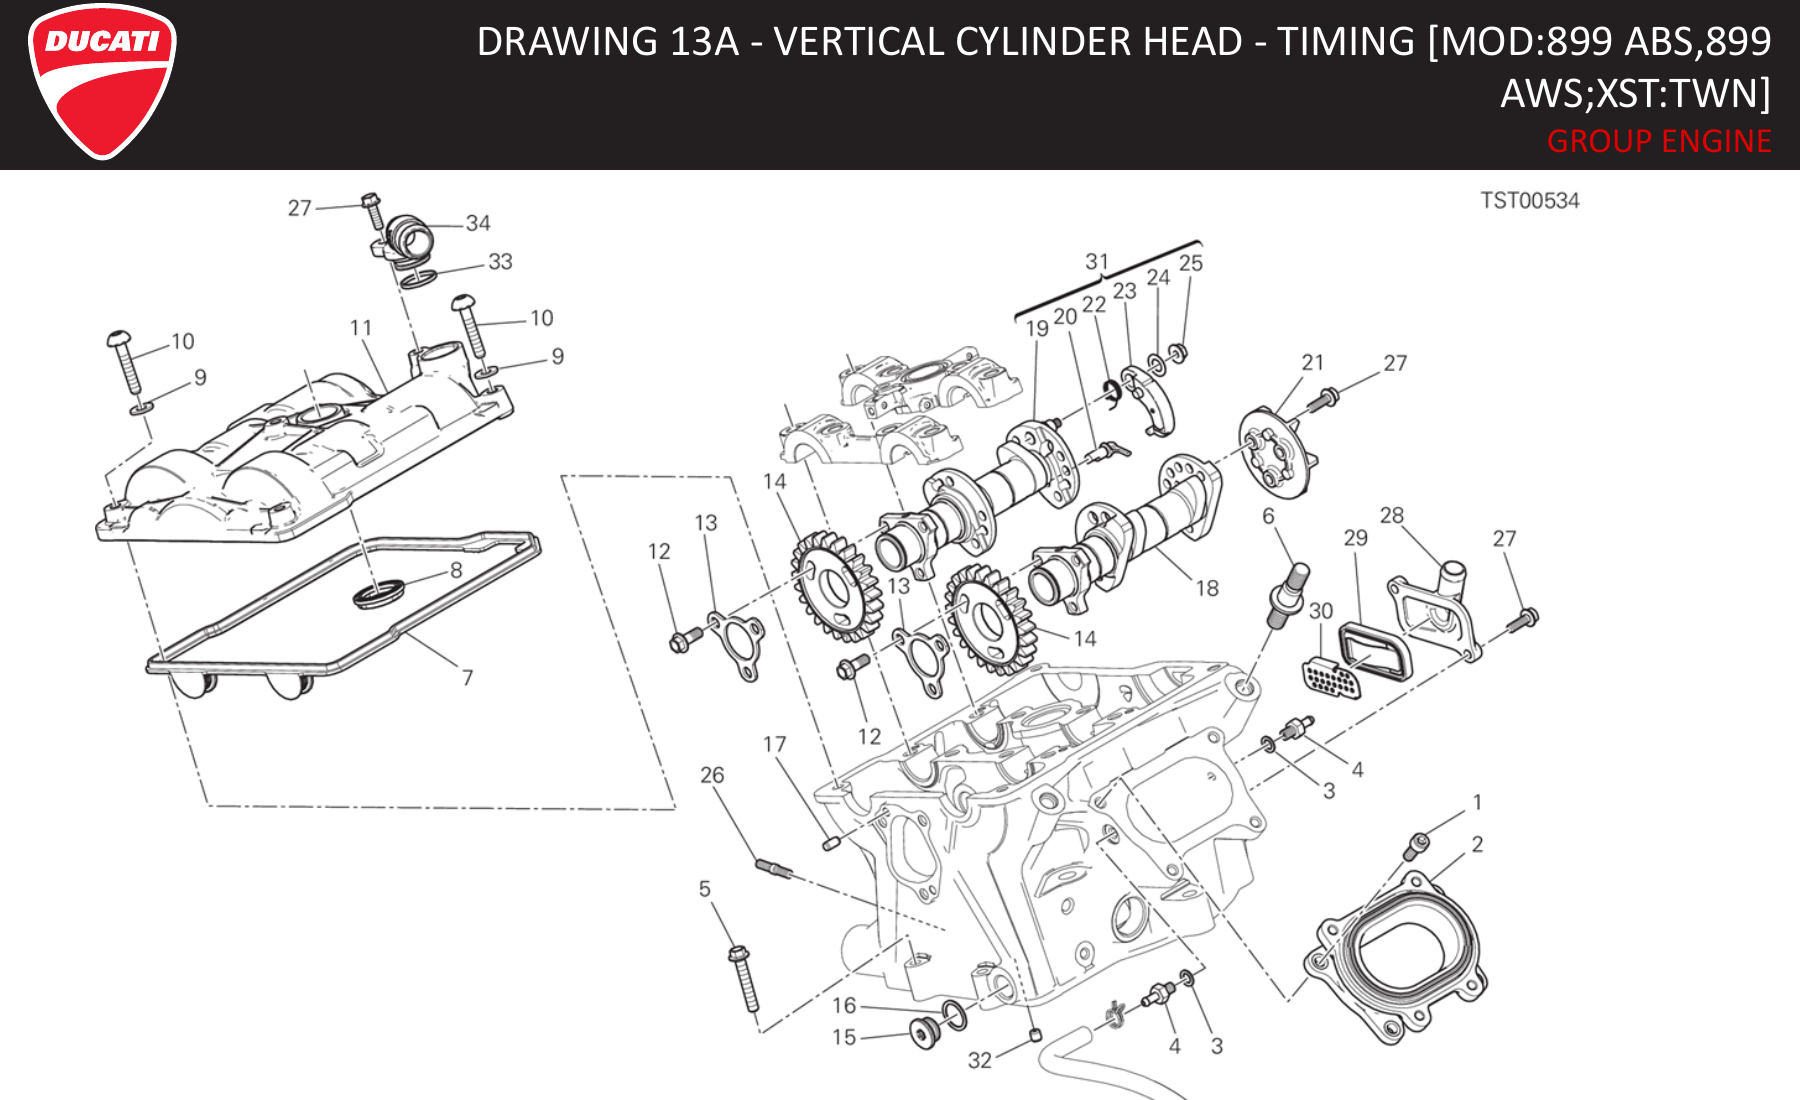
The 2015 catalogue shows the canister-free horizontal head on pages 40-41 for AUS,EUR,FRA,JAP. The Taiwan hose-and-union version is on page 42. The separate USA catalogue shows the US/Canada version on pages 40-41.
Vertical cylinder head
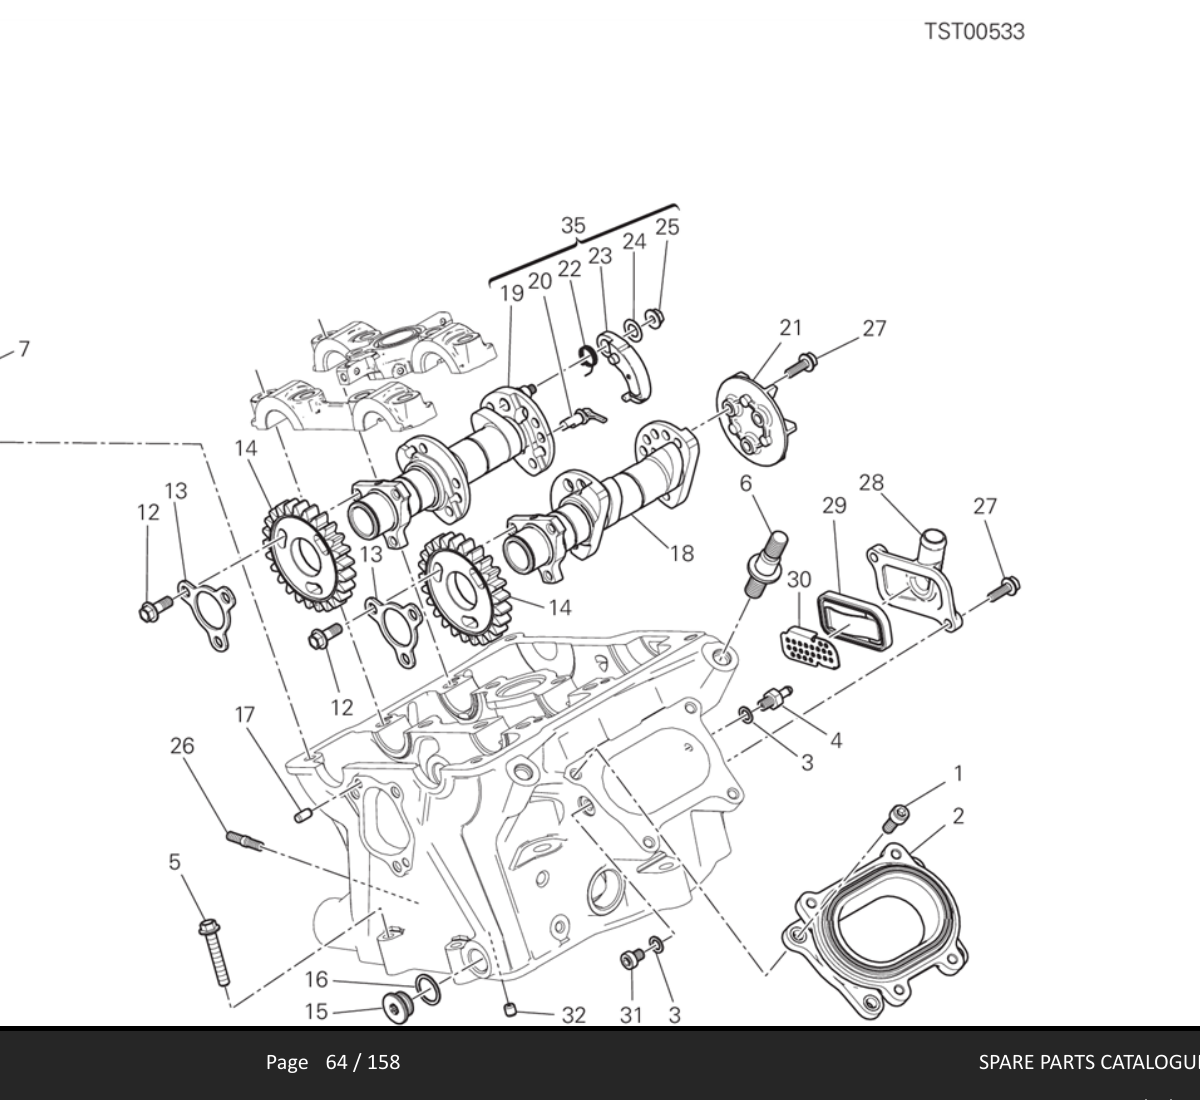
The 2015 catalogue shows the canister-free vertical head on pages 64-65 for AUS,EUR,FRA,JAP. The Taiwan hose-and-union version is on page 66. The separate USA catalogue shows the US/Canada version on pages 60-61.
Installation checklist
- Remove the bodywork needed for access.
- On a cold motorcycle, trace and label the two tank hoses and the canister filter vacuum hoses.
- Remove the canister filter, its holder, and the plumbing used only by that system.
- Install the OEM Y-pipe tank-vent arrangement and route the open breather hose safely below the motorcycle.
- Remove the canister-filter-side vacuum union from each cylinder head, leaving the other factory union in place.
- Install one
77350618Bvacuum-port plug with one new85250231Agasket in each vacated port. - Check that neither tank hose nor the downward breather is capped, pinched, or kinked.
- Start the engine and check both head plugs for a vacuum leak before reinstalling the bodywork. A leak may cause an unstable idle, lean running, or an intake whistle.
The 899 canister filter assemblies shown in these catalogues are passive and do not list a purge solenoid or electrical connector. If a different year or 1199 variant includes additional equipment, follow its own workshop manual rather than assuming its layout is identical.
Gasket, sealant, and torque
Use the gasket without additional sealant
Use a new 85250231A gasket under each vacuum-port plug. Do not add PTFE tape, liquid thread sealant, or threadlocker unless the workshop manual specifically requires it at this exact port.
The joint is designed to seal where the screw head compresses the gasket against the port face. Adding material to the threads is unnecessary and may affect how the screw seats or how applied torque translates into clamping force.
Torque: confirmed information versus inference
The parts catalogues do not specify a torque for 77350618B, and the workshop-manual review did not locate a dedicated entry for this exact M6x8 vacuum-port screw.
The manual gives approximately 8-10 Nm for other M6 fasteners, depending on the application. That range is context, not a specification for this plug. The 15 Nm figure listed for a different rocker-arm plug must not be transferred to this application.
Using 8 Nm is a conservative installation inference, not a confirmed Ducati specification for 77350618B. Use clean, dry threads and a new gasket. If Ducati service data or a dealer provides an exact value for this port, use that value instead.
General forum guides
These were the first guides used to understand the canister filter delete. They are useful for access, identifying hoses, routing ideas, and owner experiences. The Ducati catalogues above remain the source for the OEM configuration and OEM part numbers.
- DucatiForum canister filter delete guide - the main practical guide.
- DucatiForum canister filter delete guide, page 4 - later discussion covering access and hose routing.
- 899 Panigale canister filter discussion - an 899-specific write-up showing the former canister tank-vent hose joined to the existing overflow route with a T-fitting while the engine-side vacuum line is blocked.
- 899/1199 fuel leak from the breather tube - an 899-specific example of why the post-delete tank-vent arrangement and hose routing matter.
The 899panigale.org post reproduces the tank-routing concept with an aftermarket T-fitting. Pages 116-117 of the Ducati catalogue show that the proper canister-free configuration uses an OEM Y-pipe. This article follows the catalogue arrangement and replaces the engine-side hose caps used in many forum guides with the factory vacuum-port screws and gaskets.
Sources
- Primary source - Ducati 2015 899 Panigale spare-parts catalogue:
2015 899 panigale spare parts catalogue.pdf, pages 40-42, 64-66, 116-117, and 126-127. - Primary source - Ducati 899 Panigale USA MY14 spare-parts catalogue:
parts manual Superbike_899_Usa_EN_MY14.pdf, pages 40-41, 60-61, and 116-117. - Primary service reference - Ducati 899 Panigale workshop manual: checked for a dedicated torque value for the M6x8 vacuum-port screw; no dedicated entry was located.
- Ducati Manuals, Genuine Parts and Maintenance Schedules.
All page numbers above are the numbers printed in the catalogue footers, not inferred PDF indexes.